Category: Google Slides

  • How to Add Video to Google Slides (YouTube, Google Drive & MP4 Guide)

    How to Add Video to Google Slides (YouTube, Google Drive & MP4 Guide)

    Whether I’m creating a business presentation, a classroom lesson, or a project proposal, adding videos is one of the easiest ways to make my slides more engaging. A well-placed video can explain complex ideas, capture attention, and make presentations far more memorable than text alone.

    Fortunately, Google Slides makes it simple to embed videos directly into your presentation. You can insert videos from YouTube, use videos stored in Google Drive, and customize playback settings so they play exactly when you want.

    In this guide, I’ll walk you through every method available to add videos to Google Slides. I’ll also share practical tips, common mistakes to avoid, and troubleshooting solutions if your videos don’t play correctly.

    Why Add Videos to Google Slides?

    Adding videos isn’t just about making slides look better it helps communicate information more effectively.

    Here are some of the biggest benefits I’ve experienced when using videos in presentations.

    Improve Audience Engagement

    Videos naturally capture attention better than long paragraphs or static images. Instead of explaining every concept with text, you can let a short video demonstrate it in seconds.

    This is especially useful during:

    • Business presentations
    • Product demonstrations
    • Marketing pitches
    • Educational lessons
    • Team training sessions

    Explain Complex Topics Faster

    Some ideas are easier to show than describe.

    For example, if you’re explaining software, a screen recording is often much more effective than multiple screenshots. Similarly, product demonstrations, tutorials, or animated explainers can help your audience understand concepts much faster.

    Create More Professional Presentations

    Modern presentations rely on multimedia rather than text-heavy slides. Adding relevant videos helps create a polished presentation that feels more interactive and engaging.

    Increase Information Retention

    Research consistently shows that combining visuals, audio, and text helps people remember information better than text alone. Strategic use of videos can improve how well your audience understands and recalls your presentation.

    Tip: Use short, relevant videos instead of lengthy clips. In most presentations, videos between 30 seconds and 2 minutes work best because they support your message without distracting from it.

    Ways to Add Videos to Google Slides

    Google Slides offers multiple ways to insert videos, and the best method depends on where your video is stored.

    Method Best For Internet Required
    YouTube Video Public videos, tutorials, demos Yes
    Google Drive Video Personal or company videos Yes (for most presentations)
    Uploaded MP4 (via Google Drive) Recorded presentations, custom videos Yes (through Drive access)

    If you’re working with a video stored on your computer, you’ll first need to upload it to Google Drive before inserting it into your presentation.

    How to Add a YouTube Video to Google Slides?

    Adding a YouTube video is the quickest and most popular method because Google Slides integrates directly with YouTube.

    I usually use this option when I want to include tutorials, promotional videos, interviews, webinars, or product demonstrations.

    Method 1: Search for a YouTube Video

    Step 1. Open your presentation in Google Slides.
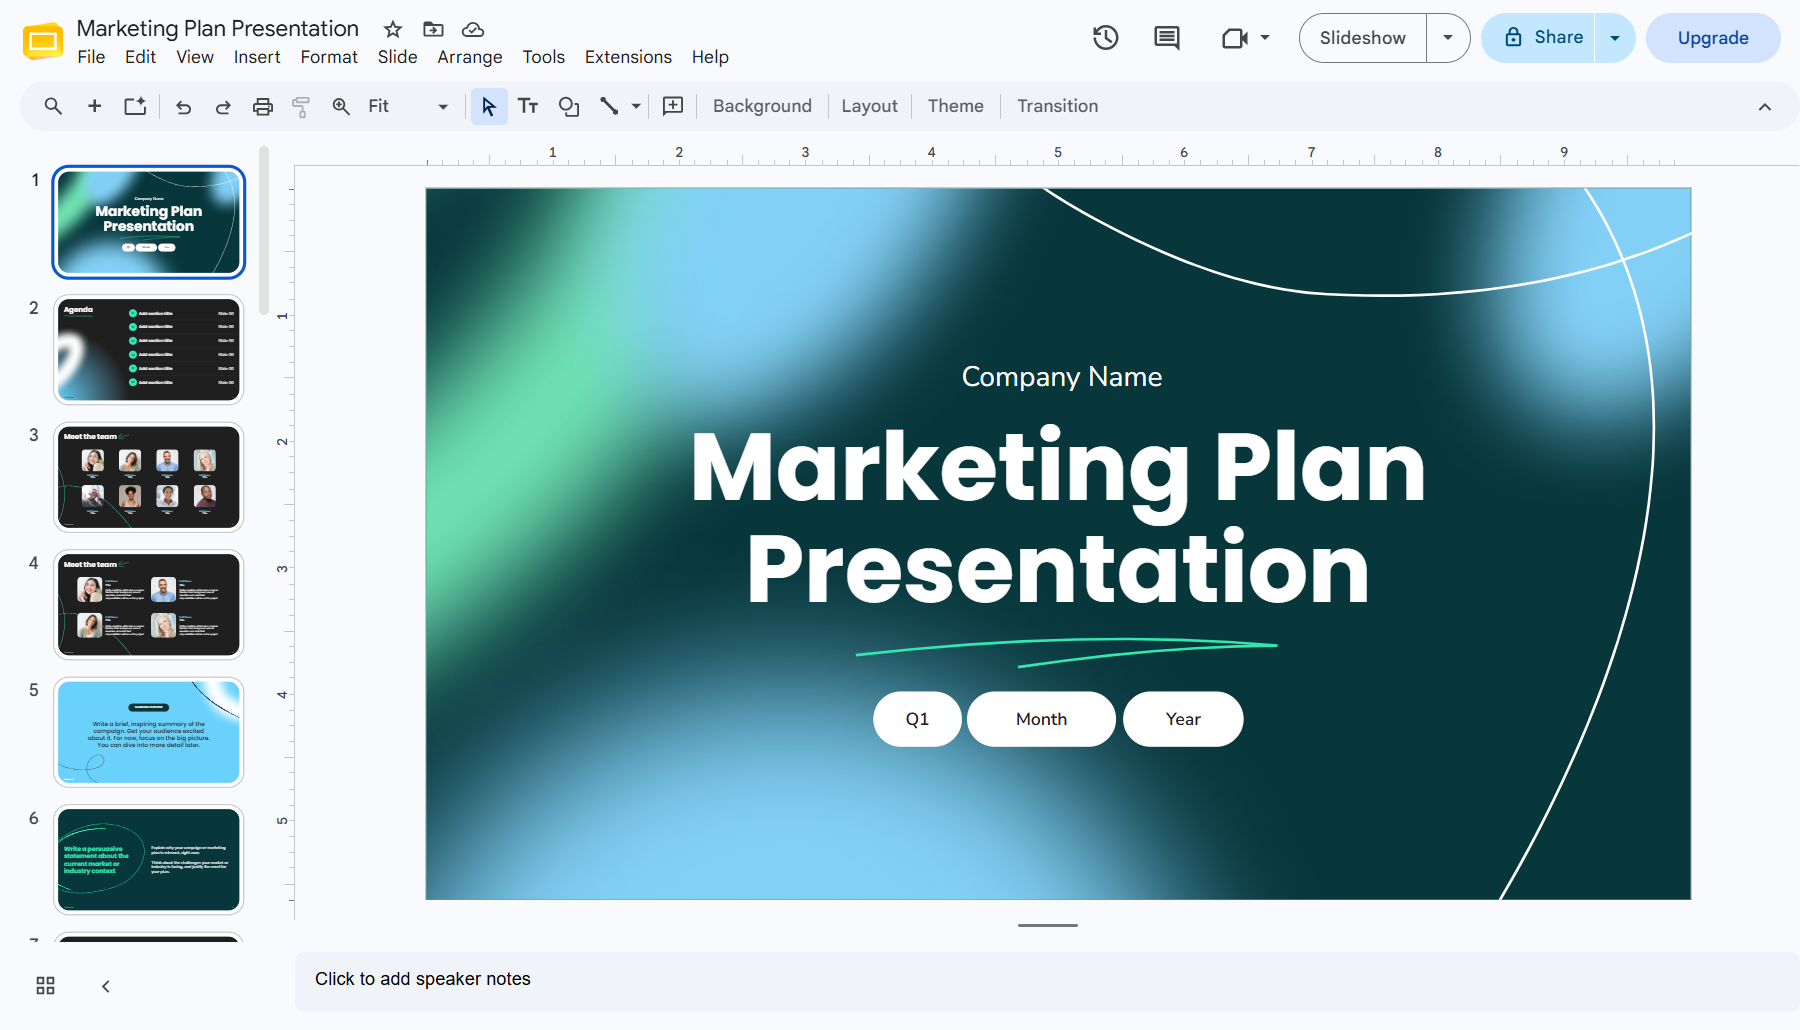
    Step 2. Select the slide where you want the video to appear.
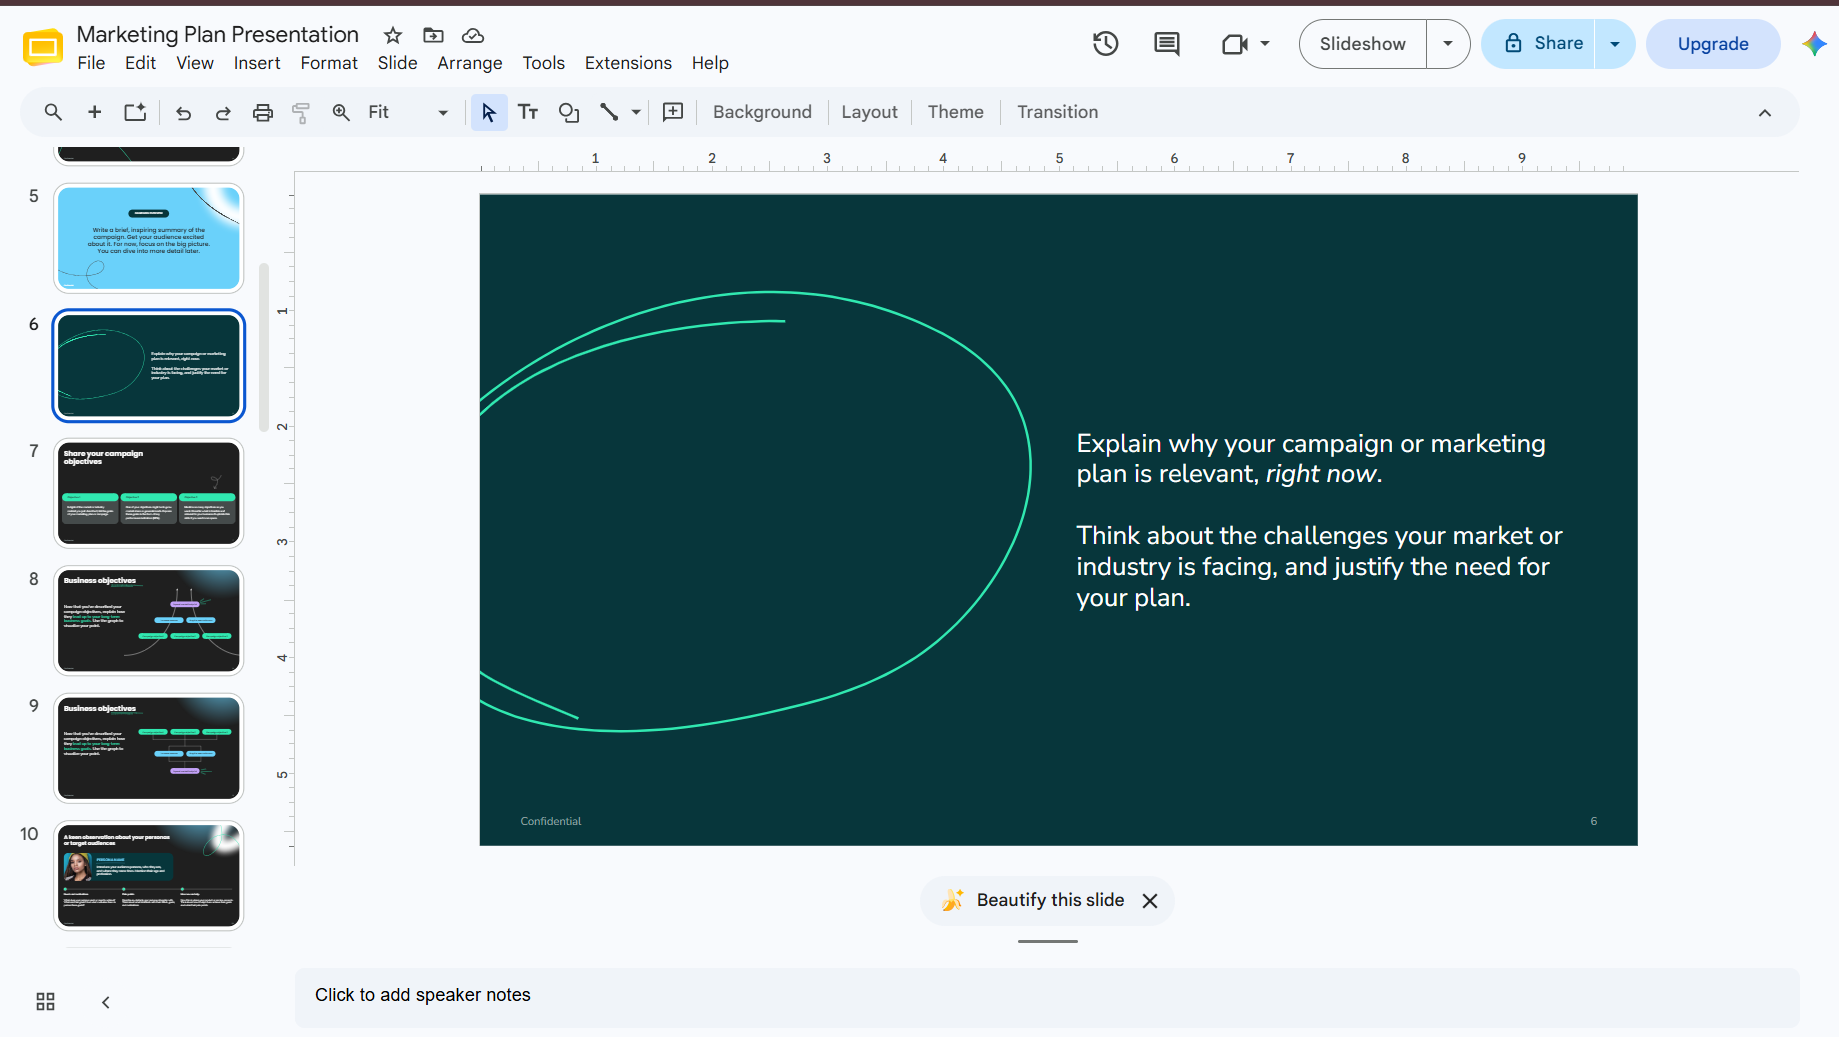
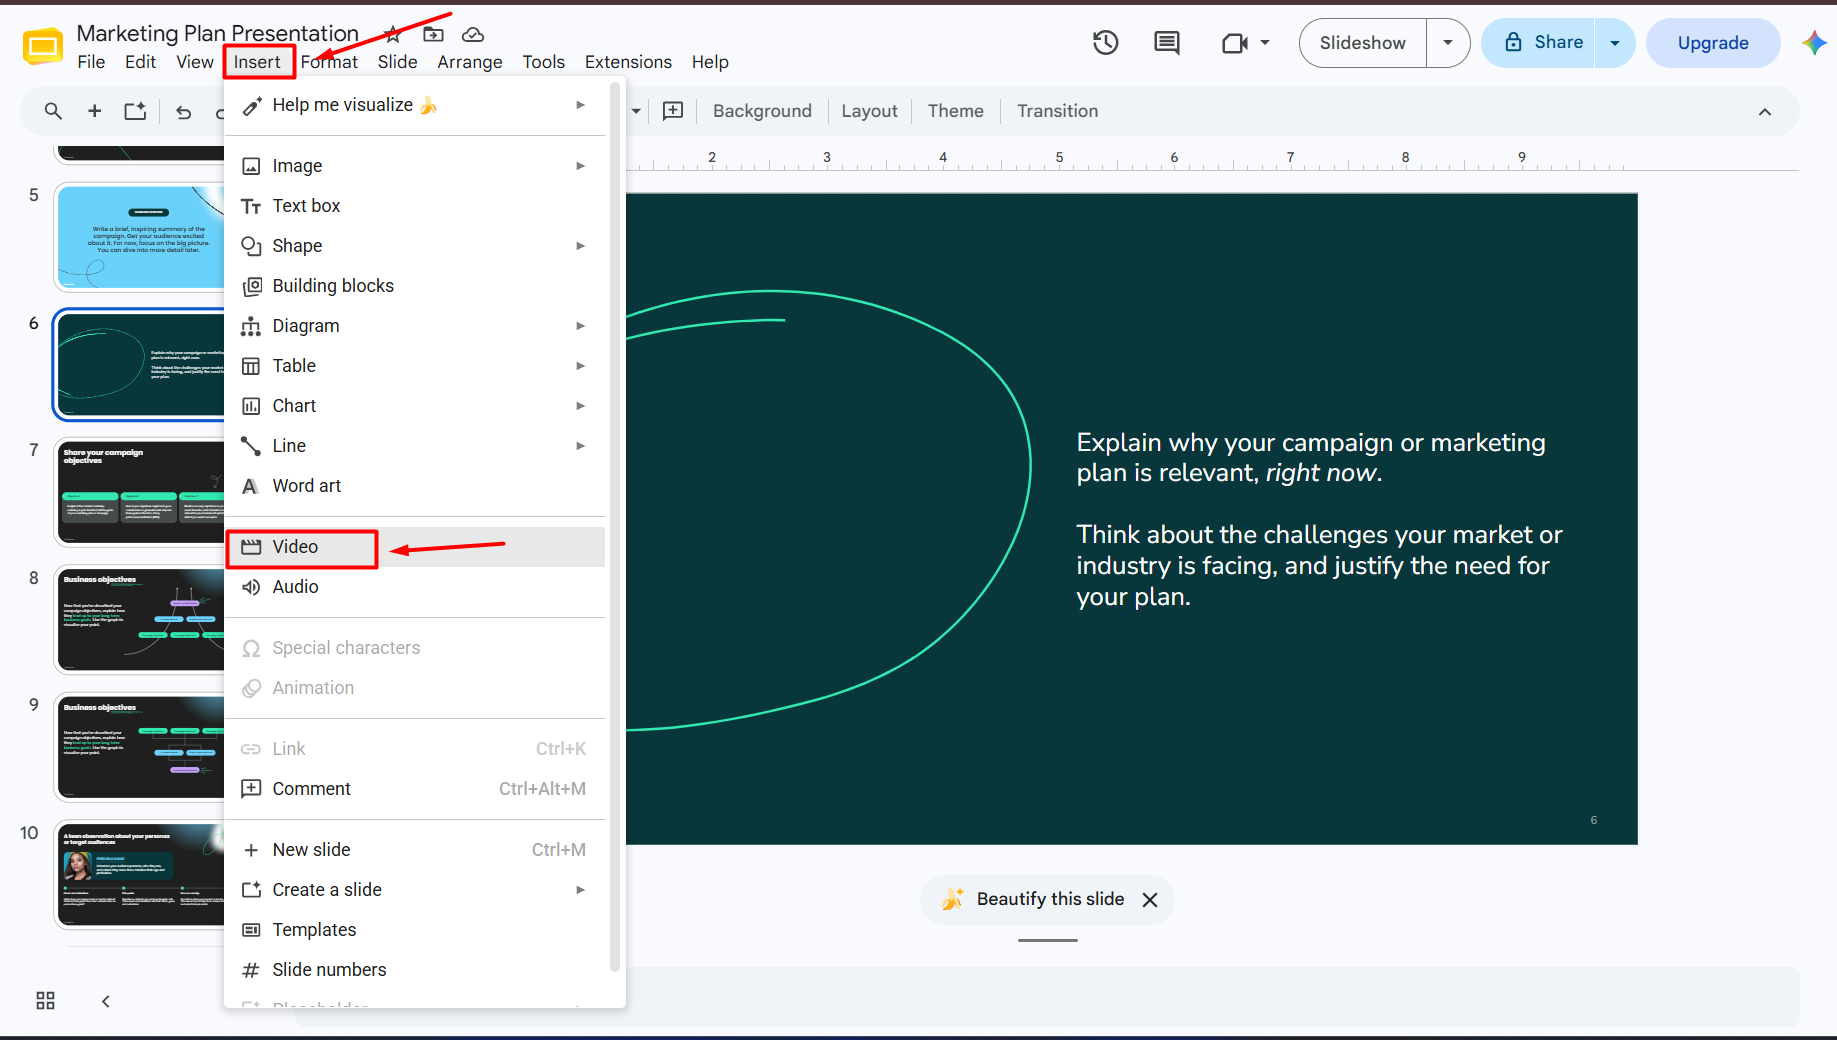
    Step 3. Click Insert from the top menu.
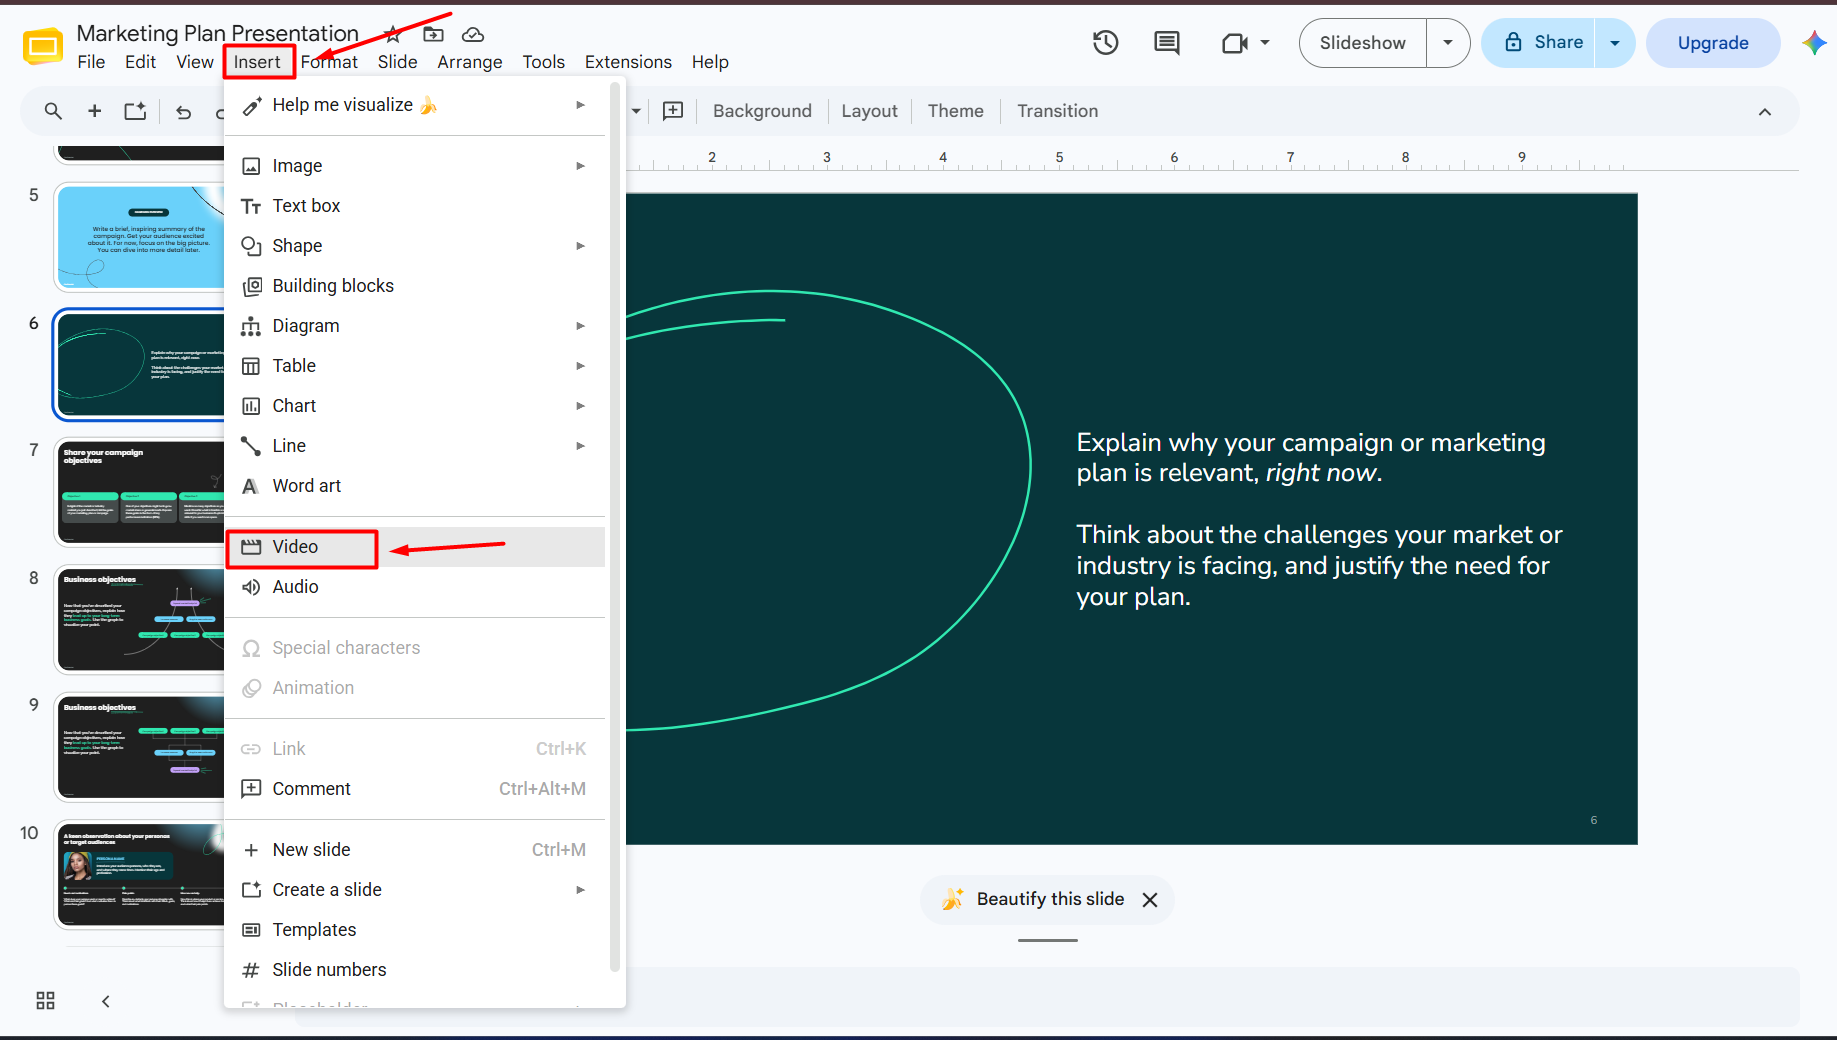
    Step 4. Select Video.

    A new window will appear with multiple options.
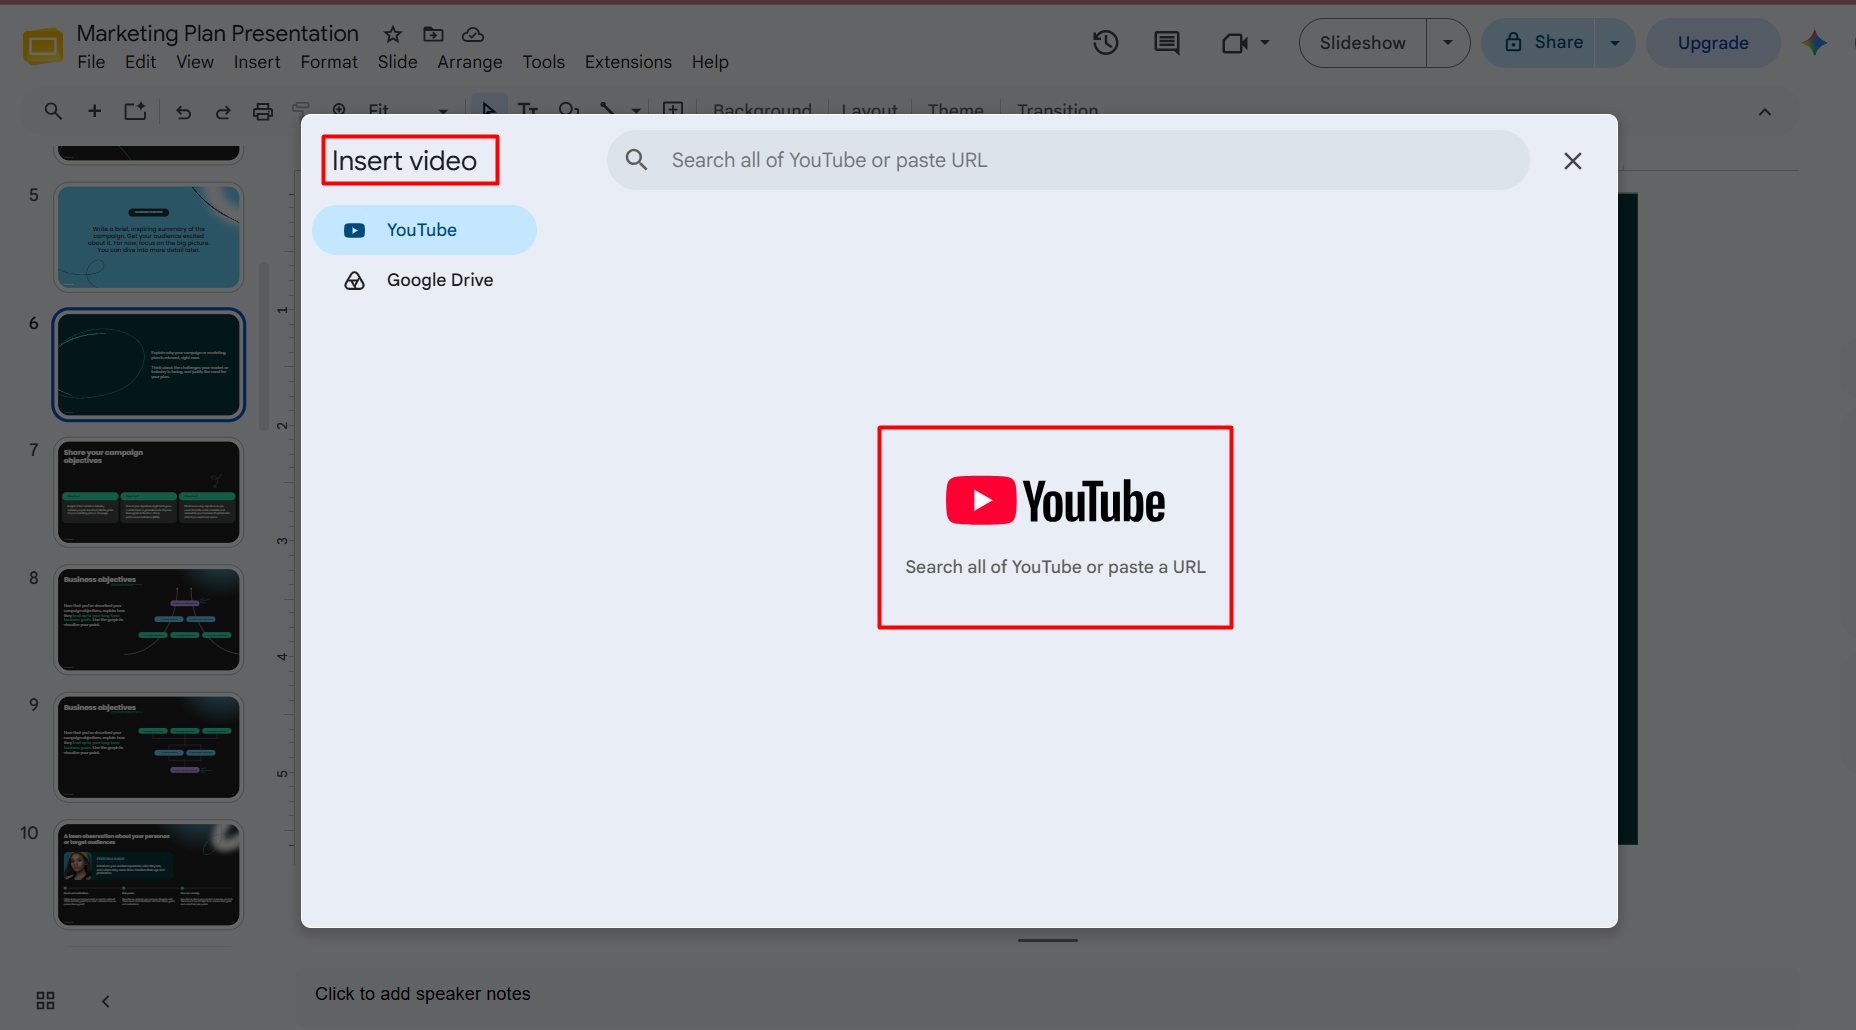
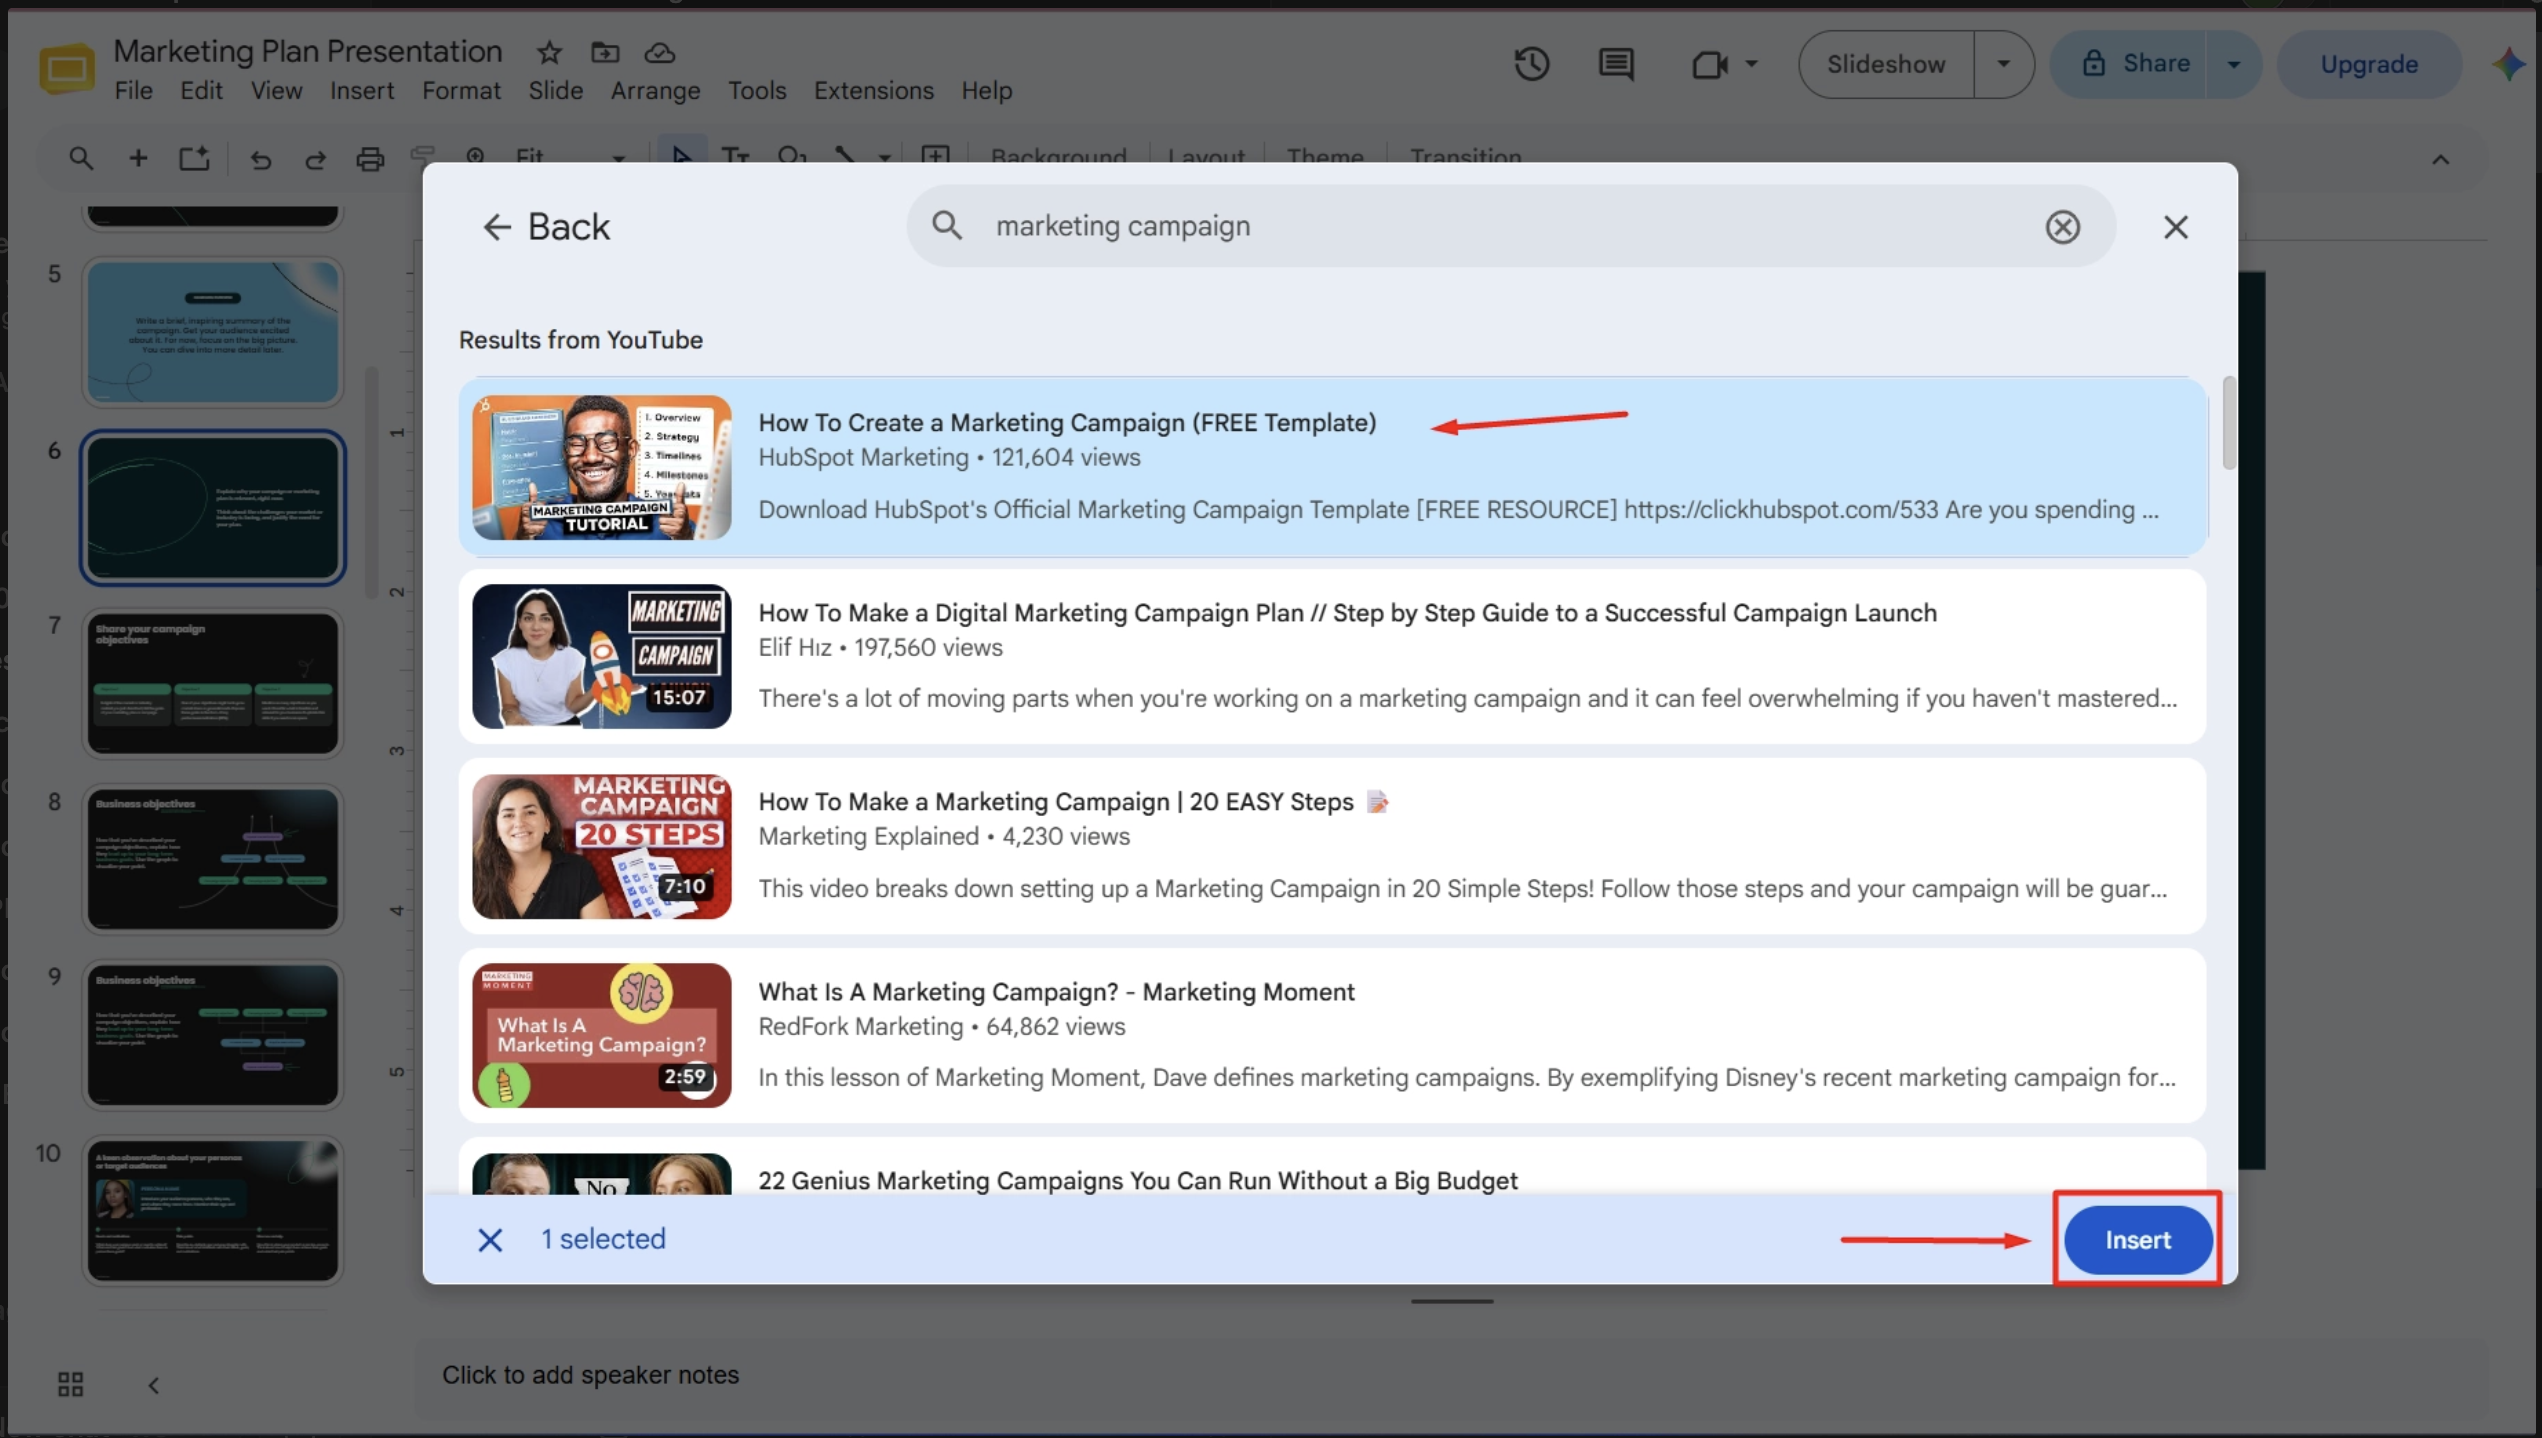
    Step 5. Choose the Search tab.
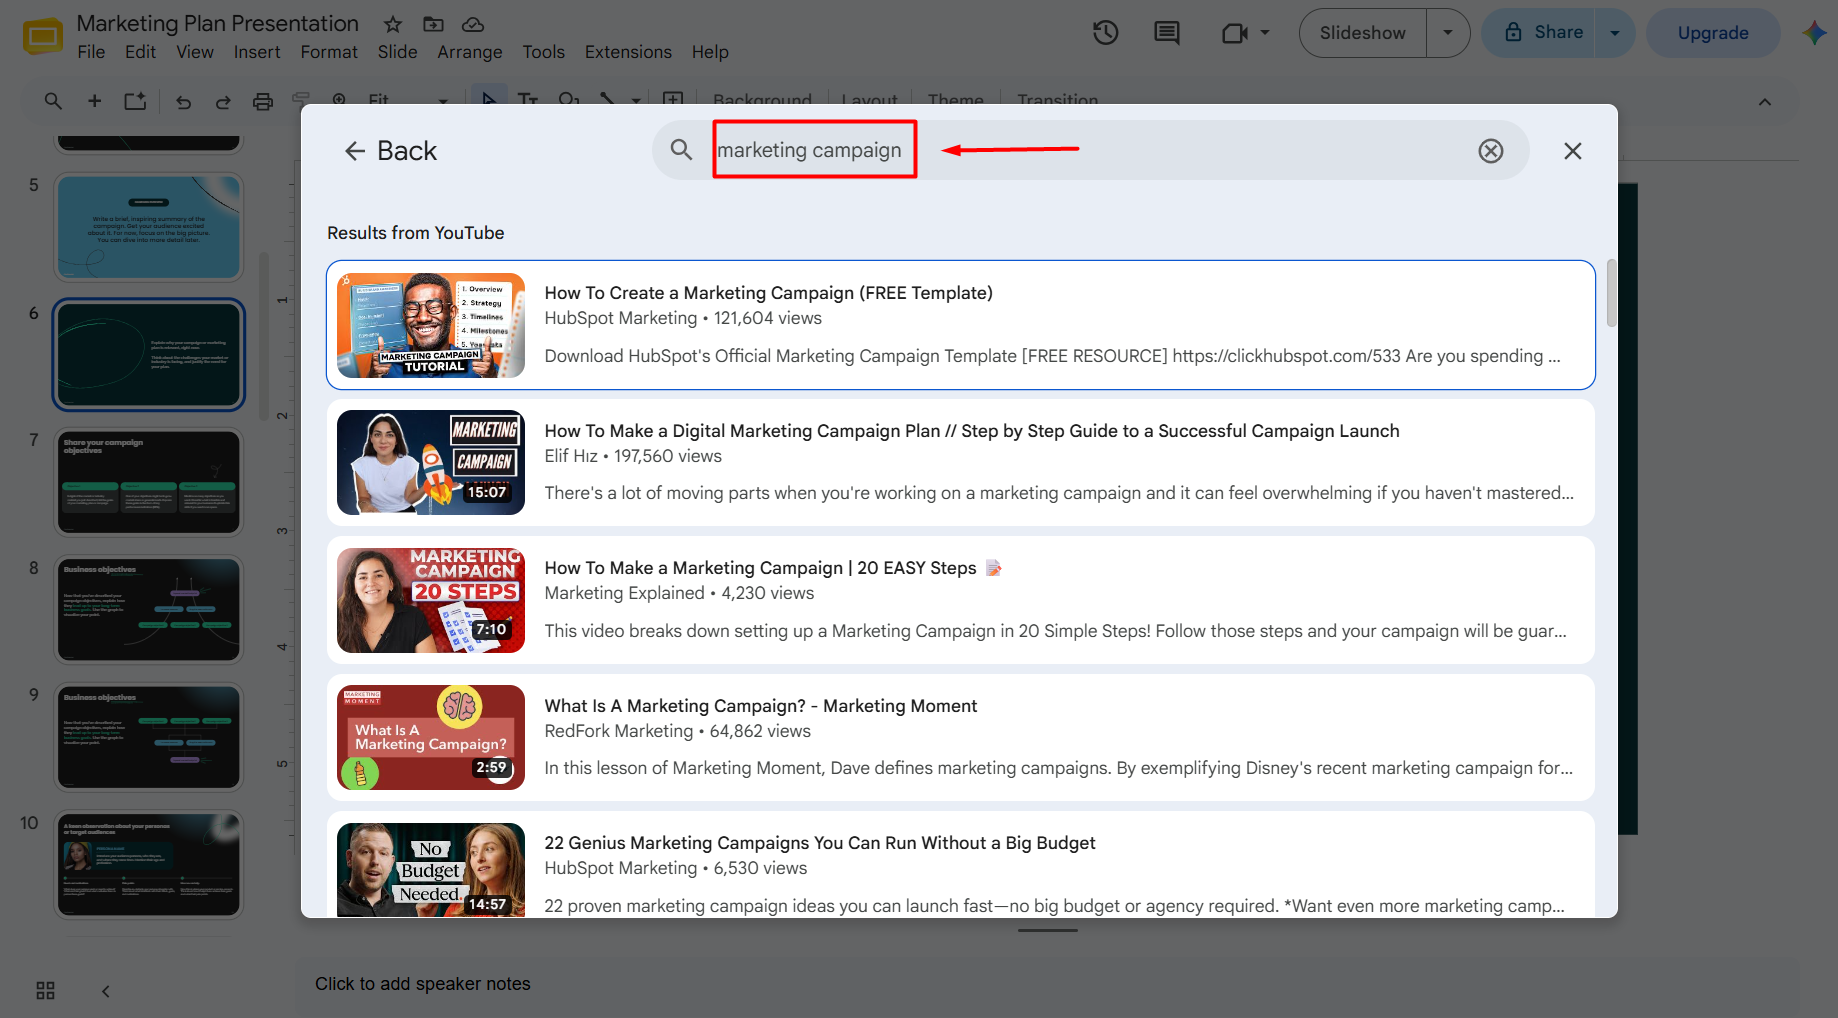
    Step 6. Type the title or keywords for the YouTube video.

    Google Slides will display matching YouTube results directly inside the editor.

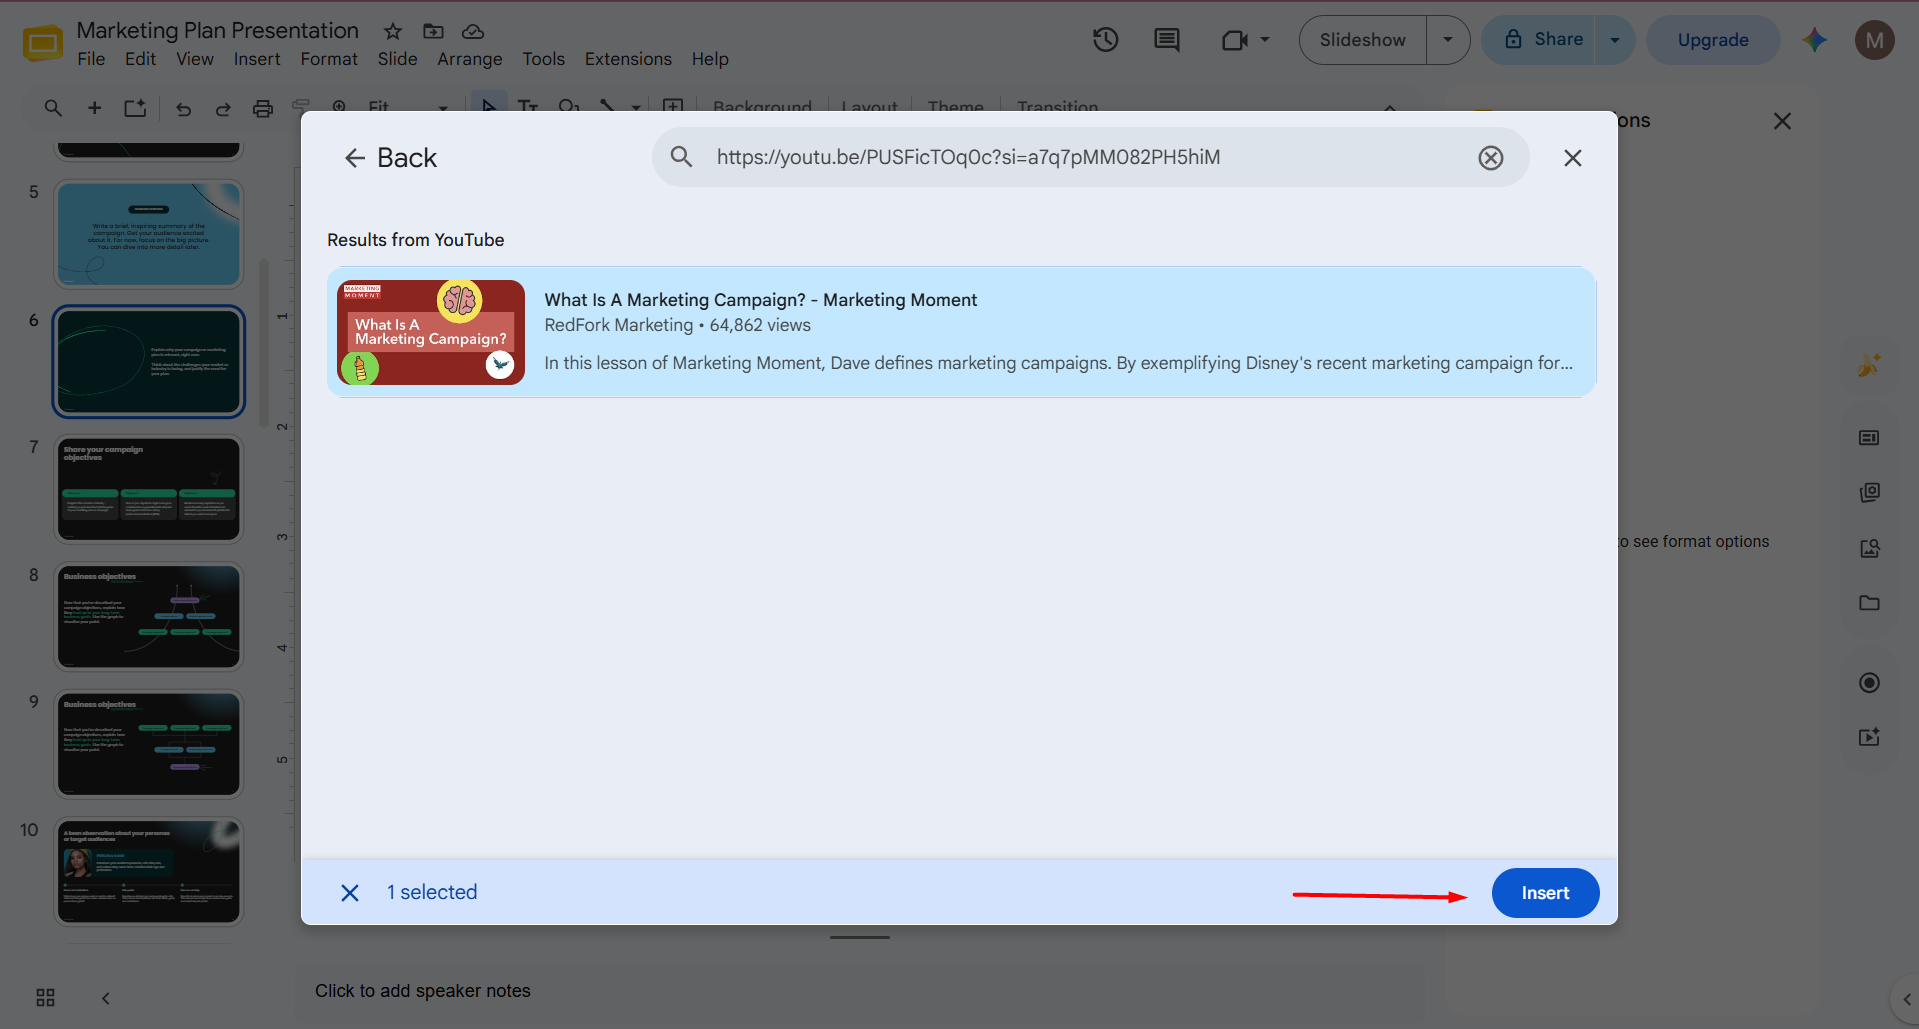
    Step 7. Select the video you want.

    Step 8. Click Insert.

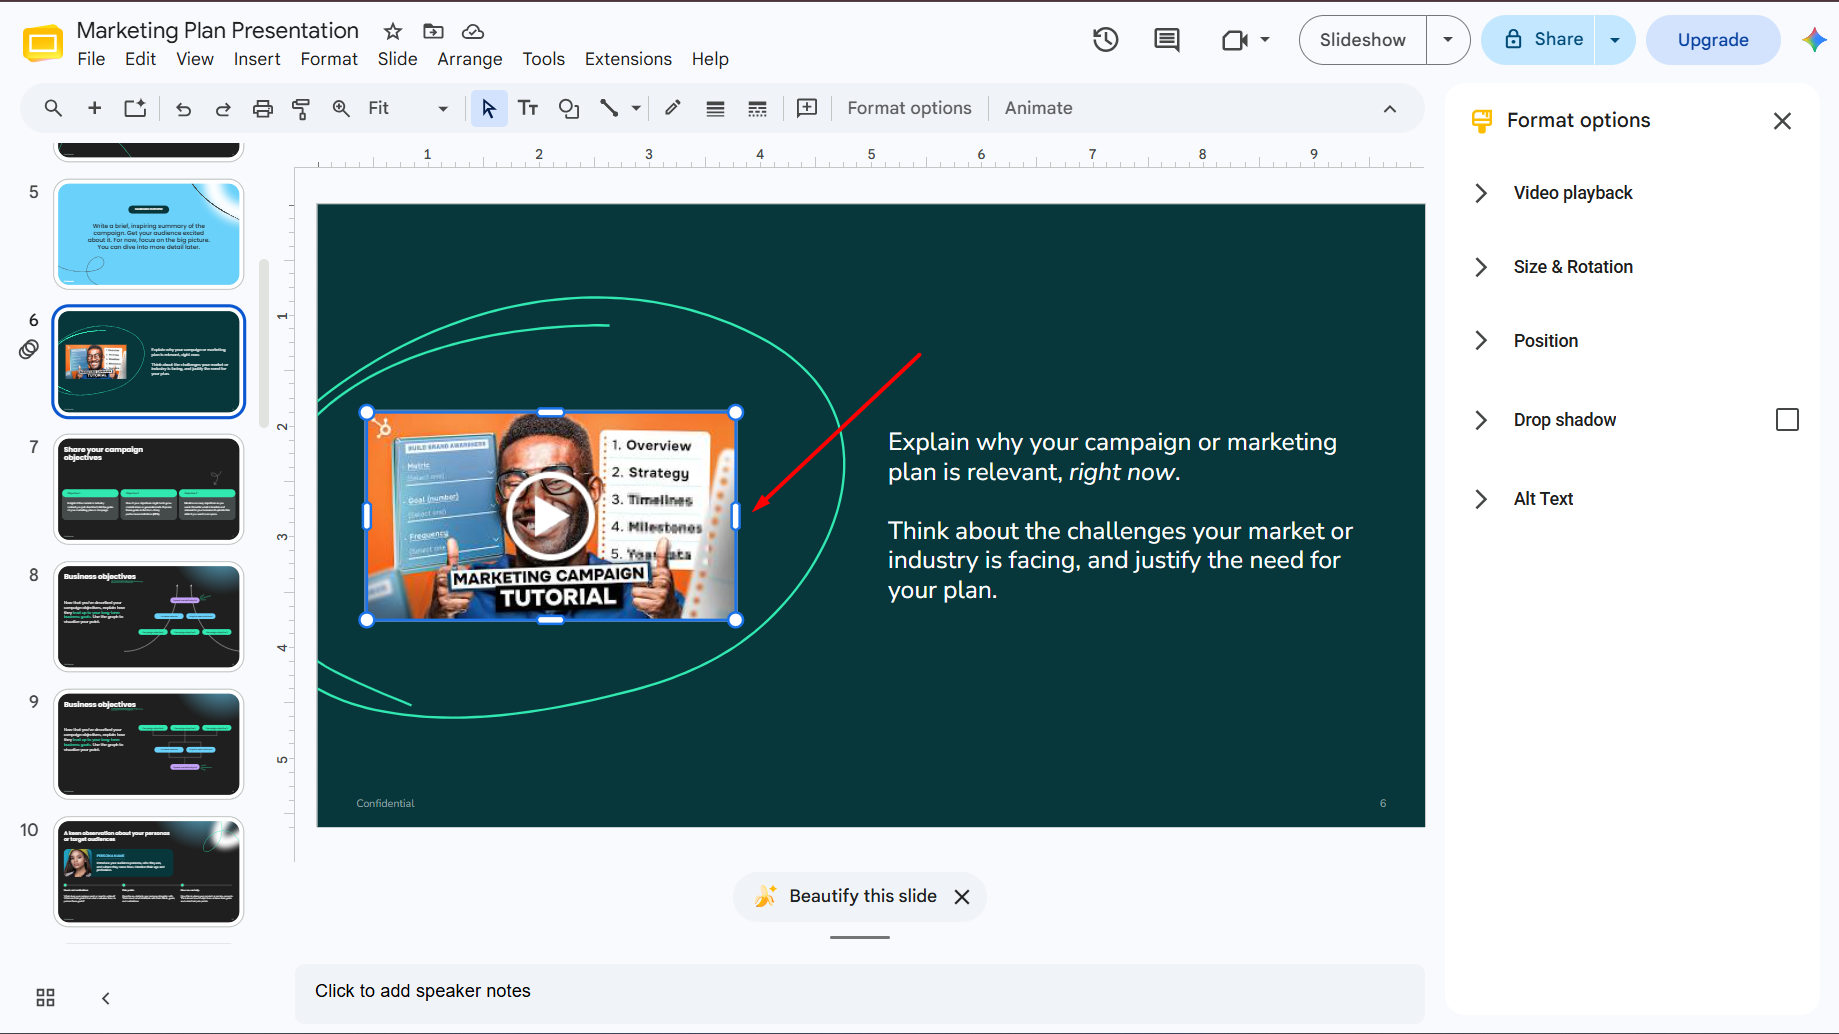
    The video will now appear on your slide, and you can resize or reposition it just like an image.
    Method 2: Insert a YouTube Video Using Its URL

    If you already have the video’s link, this method is even faster.

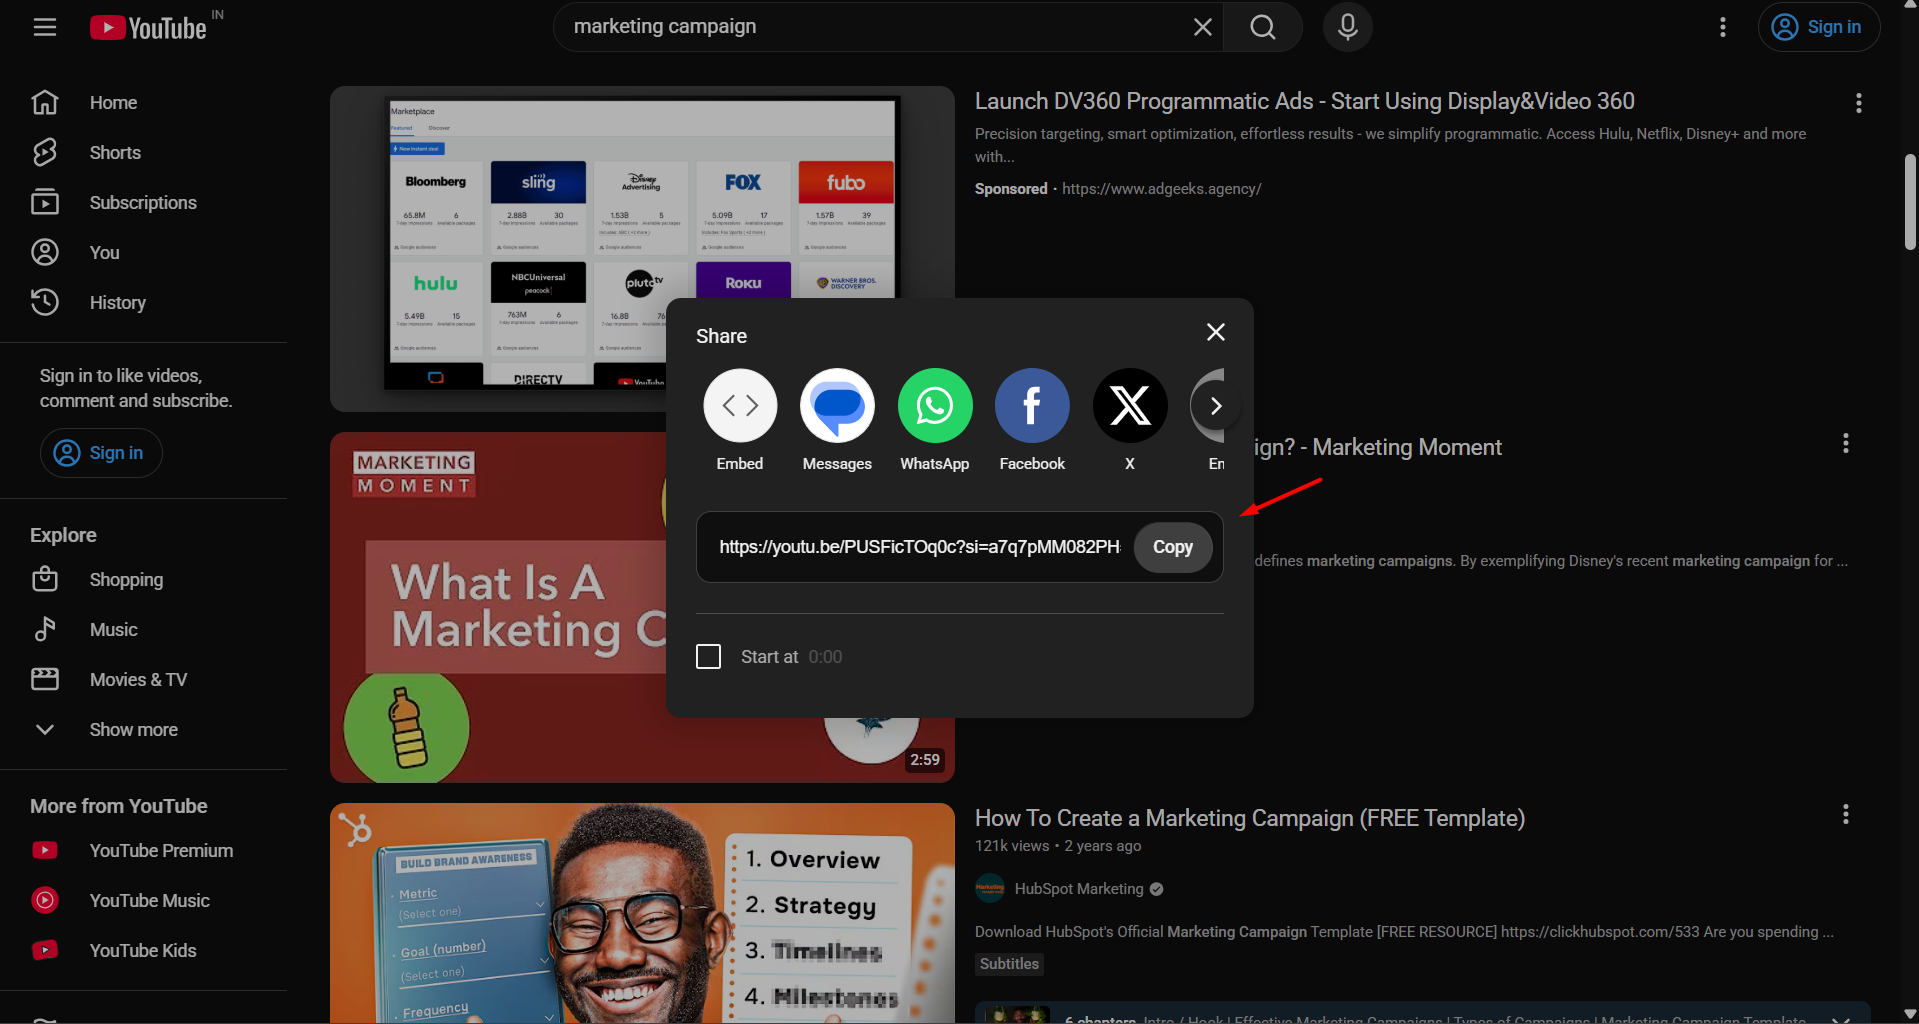
    Step 1. Copy the YouTube video’s URL.
    Step 2. In Google Slides, go to:

    Insert → Video
    Step 3. Select the By URL option.

    Step 4. Paste the YouTube link.
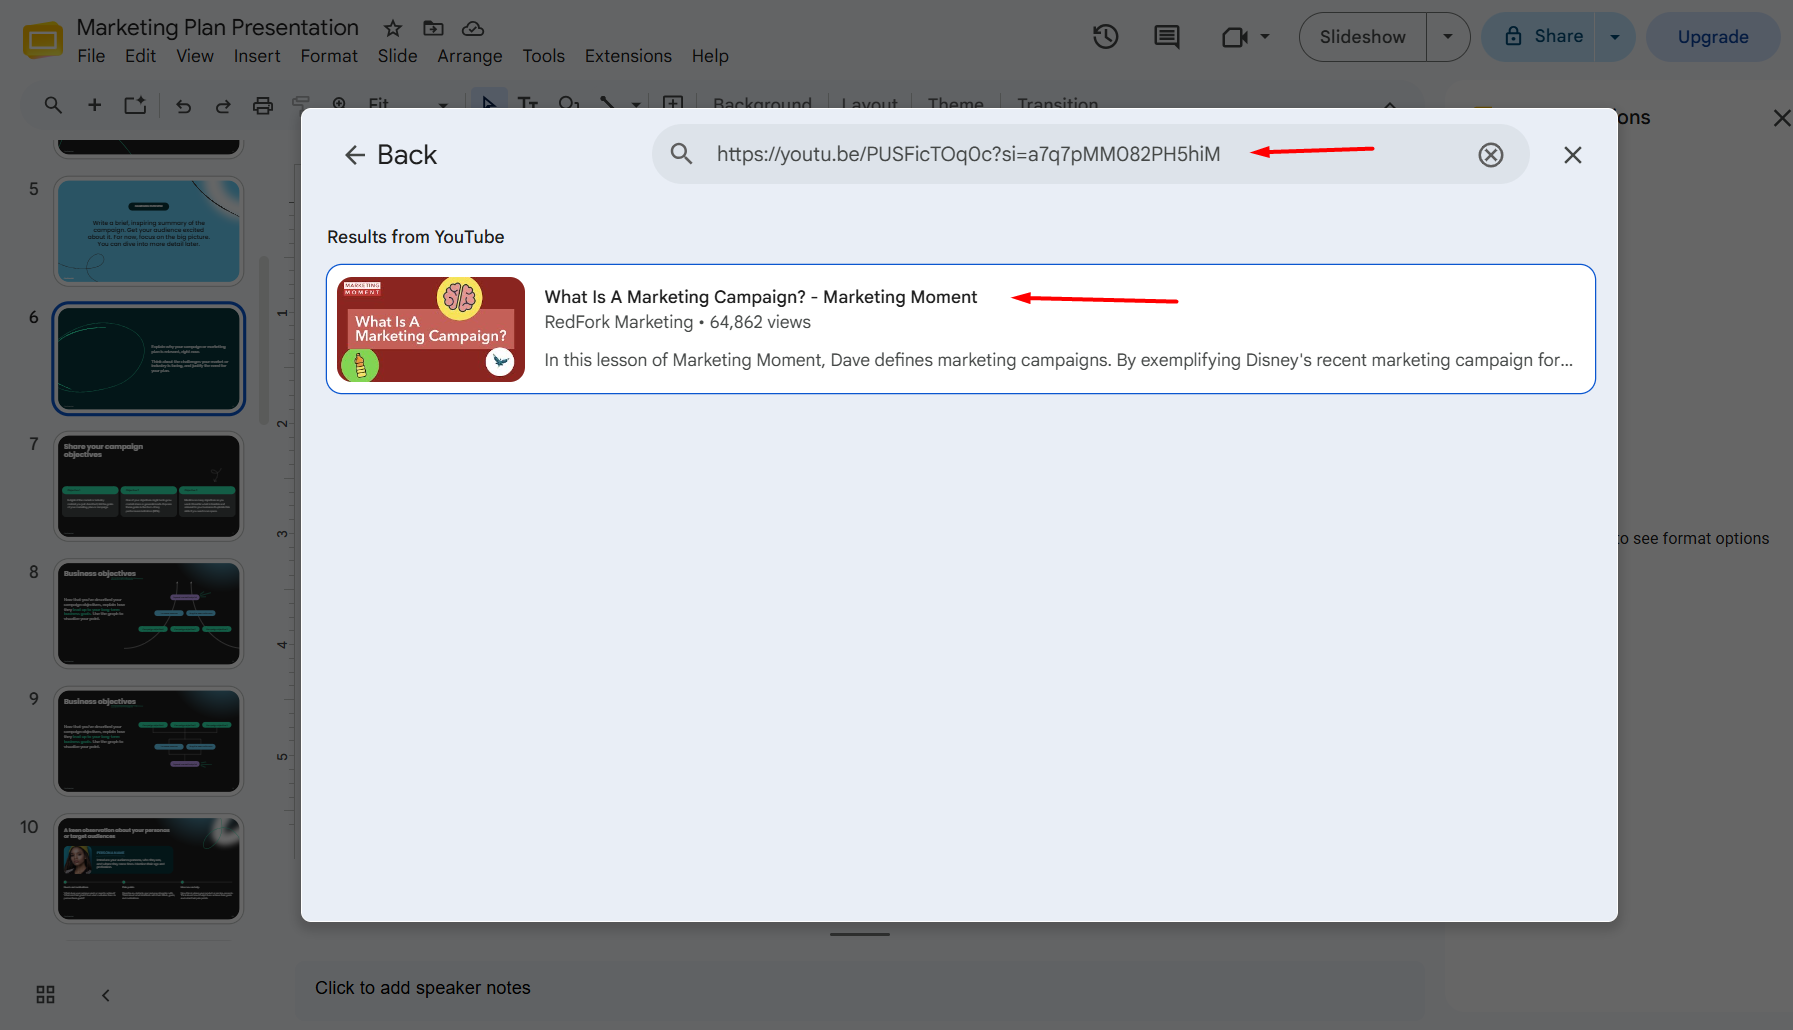
    Step 5. Click Insert.

    Google Slides will automatically embed the video into your presentation.
    Pro Tip

    Before presenting, play the embedded video once to make sure it loads correctly. This helps avoid unexpected playback issues during your presentation, especially if you’re using a shared internet connection.

    Common Mistakes

    Avoid these common errors when inserting YouTube videos:

    • Using deleted or unavailable YouTube videos
    • Embedding age-restricted videos that require login
    • Assuming the video will work offline
    • Forgetting to test playback before presenting

    How to Add a Video from Google Drive?

    If you’ve created your own video or downloaded one from another source, Google Drive is usually the best option.

    I often use Google Drive for company training videos, recorded meetings, product walkthroughs, and custom tutorials that aren’t available on YouTube.

    Step 1: Upload Your Video to Google Drive

    If your video isn’t already stored in Google Drive:

    1. Open Google Drive.
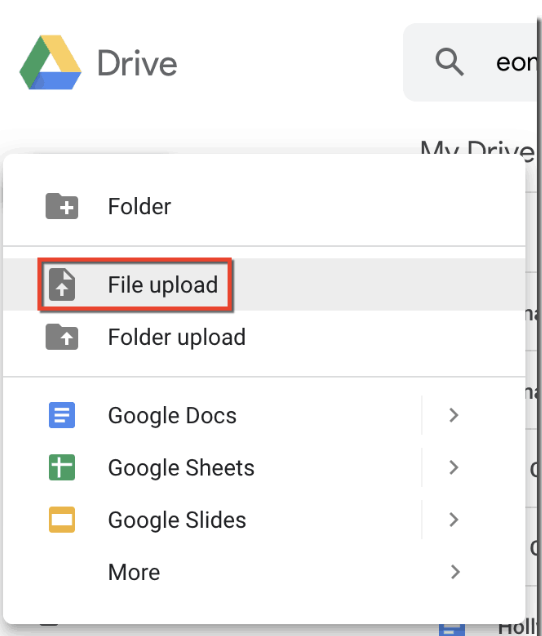
    2. Click New.
    3. Select File Upload.
    4. Choose your video file.
    5. Wait for the upload to finish.

    Once uploaded, you’re ready to insert it into Google Slides.

    Step 2: Insert the Video into Google Slides

    Open your presentation.

    Navigate to:

    Insert → Video
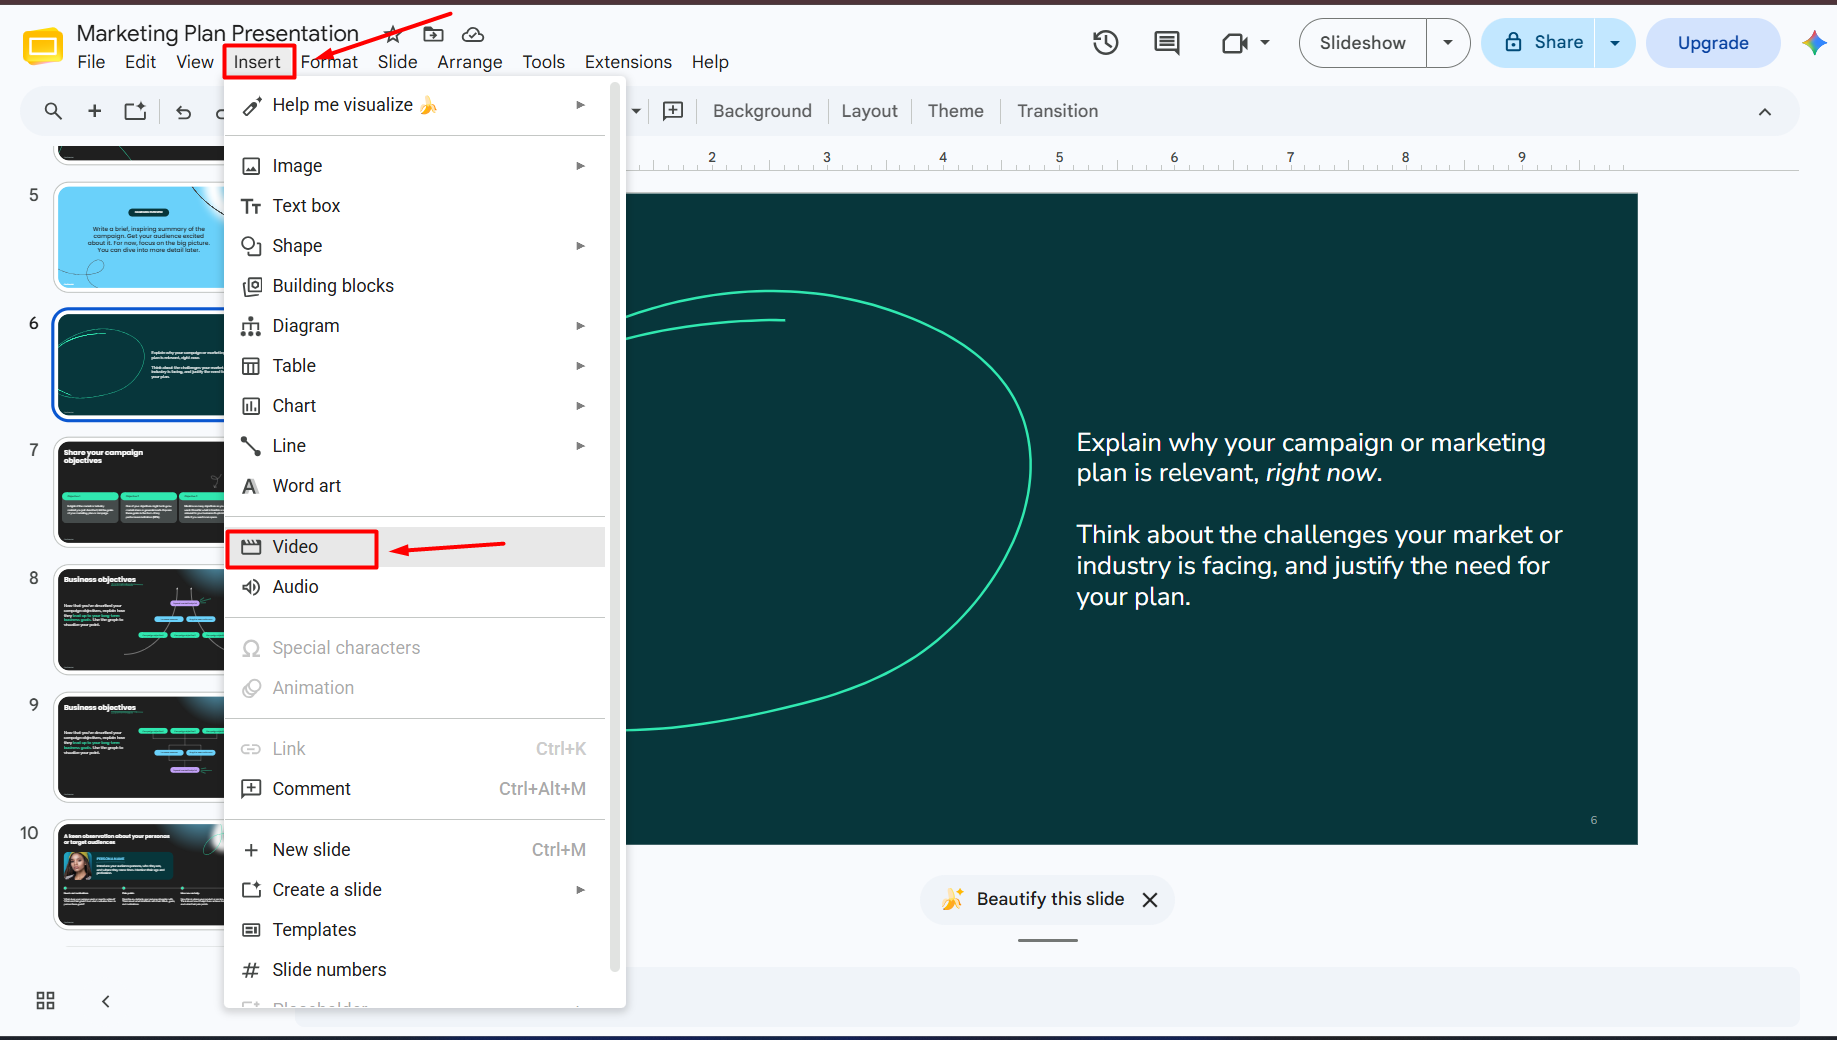
    Instead of searching YouTube, switch to the Google Drive tab.
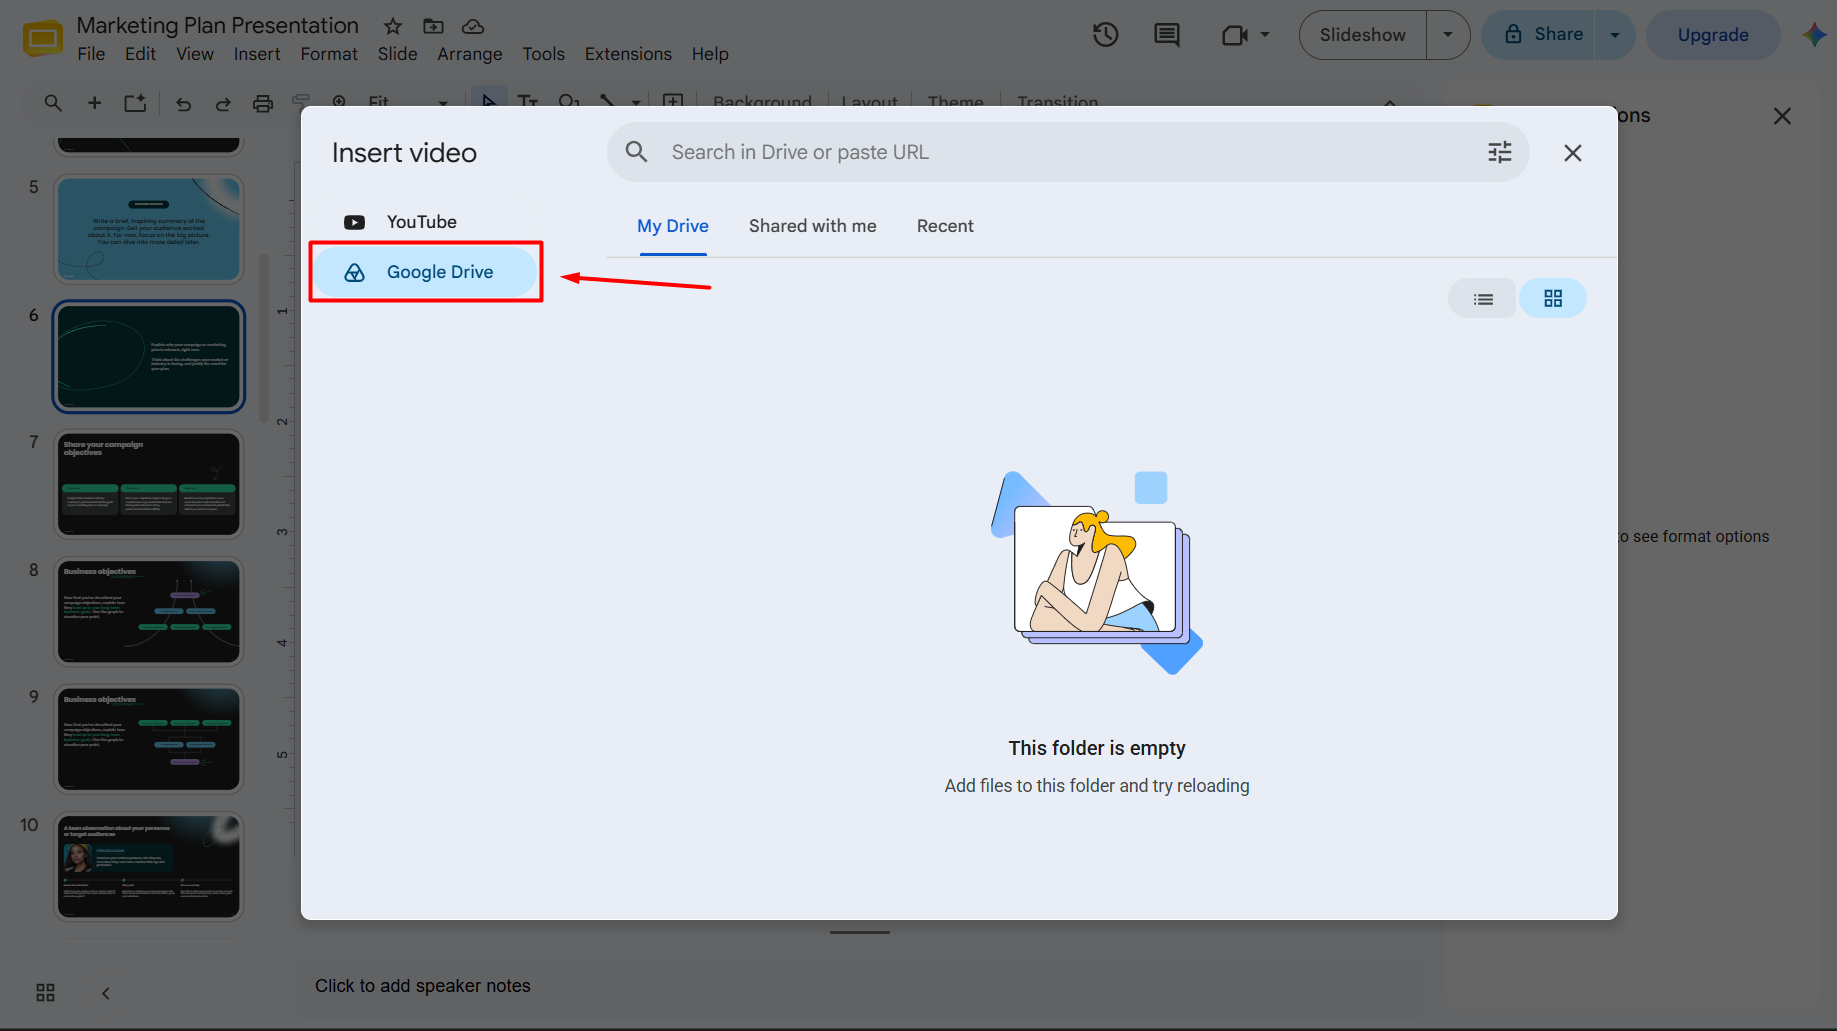
    Google Slides will display the videos stored in your Drive.

    Select your preferred video.

    Click Insert.

    The video will immediately appear on your slide.

    Share Permissions Matter

    One of the most common reasons Drive videos fail to play is incorrect sharing permissions.

    If you’re sharing your presentation with classmates, coworkers, or clients, make sure they also have permission to access the video stored in Google Drive.

    Otherwise, they may see an error instead of the video.

    I always test my presentation using another account before an important meeting to confirm that every embedded video is accessible.

    Best Practices for Google Drive Videos

    • Keep filenames descriptive so they’re easy to find.
    • Organize presentation videos in dedicated Drive folders.
    • Avoid moving or deleting videos after embedding them.
    • Use high-quality MP4 files for the best playback experience.
    • Verify sharing permissions before sending your presentation.

    Can You Upload an MP4 Directly to Google Slides?

    Many users search for ways to upload an MP4 directly into Google Slides.

    The important thing to understand is that Google Slides doesn’t store local video files inside the presentation itself. Instead, videos from your computer are typically uploaded to Google Drive first and then inserted into your slides from there.

    Here’s the typical workflow I follow:

    1. Save the MP4 file on your computer.
    2. Upload it to Google Drive.
    3. Wait for the upload to complete.
    4. Open Google Slides.
    5. Select Insert → Video.
    6. Choose the Google Drive tab.
    7. Select the uploaded video.
    8. Click Insert.

    This approach keeps your presentation lightweight while allowing Google Slides to stream the video from Drive when it’s played.

    Which Video Formats Work Best?

    For the best compatibility, use widely supported formats such as MP4 encoded with standard video and audio codecs. If you have videos in other formats, converting them to MP4 before uploading can help avoid playback issues.

    Practical Tip: Before uploading, compress large video files if possible. Smaller files upload faster, are easier to manage in Google Drive, and can reduce buffering during presentations without a noticeable loss in quality.

    How to Resize, Move, and Format Videos in Google Slides?

    Once you’ve added a video to your slide, taking a few minutes to position and format it properly can make your presentation look much more polished. A poorly placed or stretched video can distract your audience, while a well-formatted one blends naturally with your slide design.

    Here’s how I usually adjust videos before presenting.

    Resize a Video

    1. Click on the video.
    2. Drag any of the corner handles to resize it.
    3. Hold Shift (if needed) to maintain the aspect ratio while resizing.

    Tip: Resize using the corner handles instead of the side handles to avoid stretching the video.

    Move the Video

    Simply click and drag the video anywhere on the slide.

    For better alignment, Google Slides displays smart guides that help you position the video evenly with other elements.

    Align Your Video

    For professional-looking slides:

    • Center videos on the slide whenever they’re the main focus.
    • Leave enough white space around the video.
    • Keep consistent margins across all slides.
    • Align videos with text boxes and images.

    A clean layout makes your presentation easier to follow.

    Use Format Options

    Google Slides also lets you customize the appearance of videos using Format options.

    Depending on your version of Google Slides, you may be able to adjust:

    • Position
    • Size
    • Rotation
    • Drop shadow
    • Reflection (when available)

    These small adjustments can improve the overall look of your presentation without overwhelming the slide.

    Best Practice: Let the video be the focal point. Avoid placing large blocks of text directly over or next to the video unless they’re essential.

    How to Change Video Playback Settings?

    Google Slides provides several playback options that let you control how a video behaves during your presentation.

    To access these settings:

    1. Select the video.
    2. Open Format options (or the playback settings panel, depending on the interface).
    3. Adjust the available playback settings.
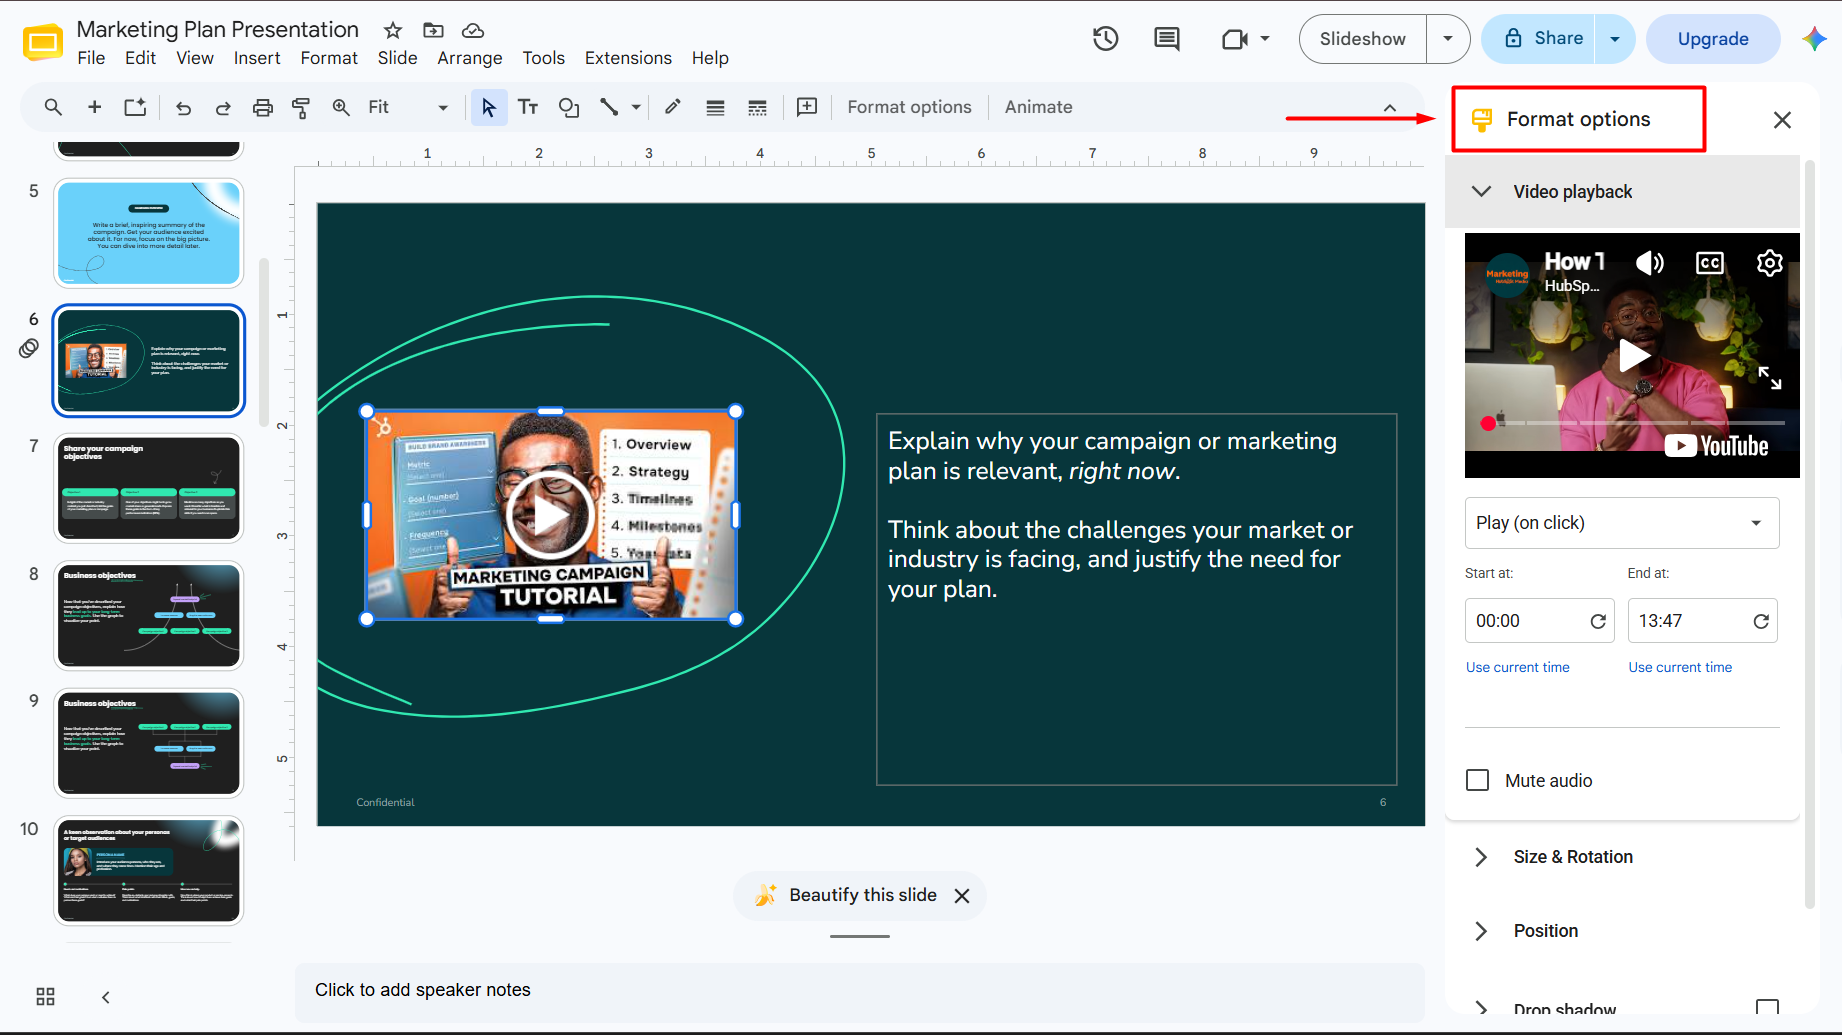
    Let’s look at the most useful options.

    Play on Click

    This is the default behavior.

    The video only starts when you click it during your presentation.
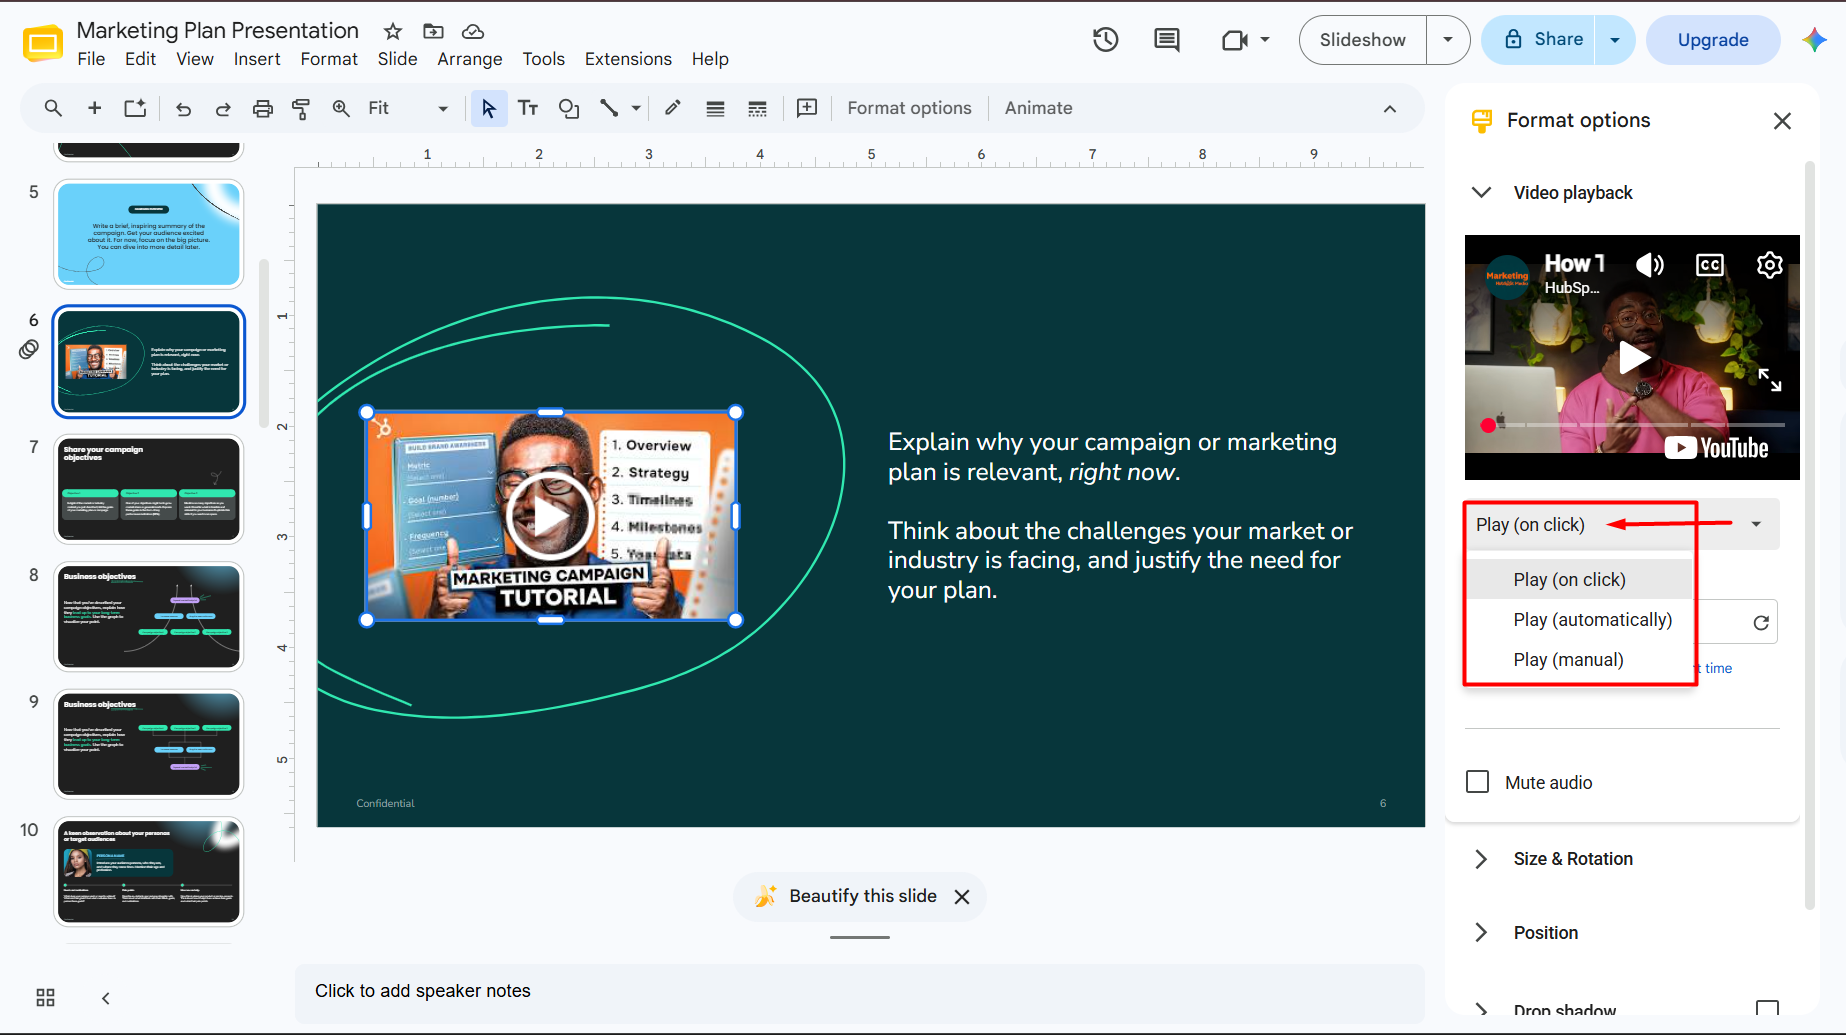
    I recommend this option for:

    • Business presentations
    • Sales pitches
    • Client meetings
    • Educational lessons

    It gives you full control over when the video begins.

    Autoplay During Presentation

    If you want the video to start automatically when you reach a slide, enable the autoplay option if it’s available in your Google Slides version.

    Autoplay works well for:

    • Welcome slides
    • Event presentations
    • Digital signage
    • Kiosk displays
    • Self-running presentations

    However, I avoid autoplay for every slide because unexpected audio can distract the audience.

    Mute Audio

    Sometimes you only want viewers to watch the visuals.
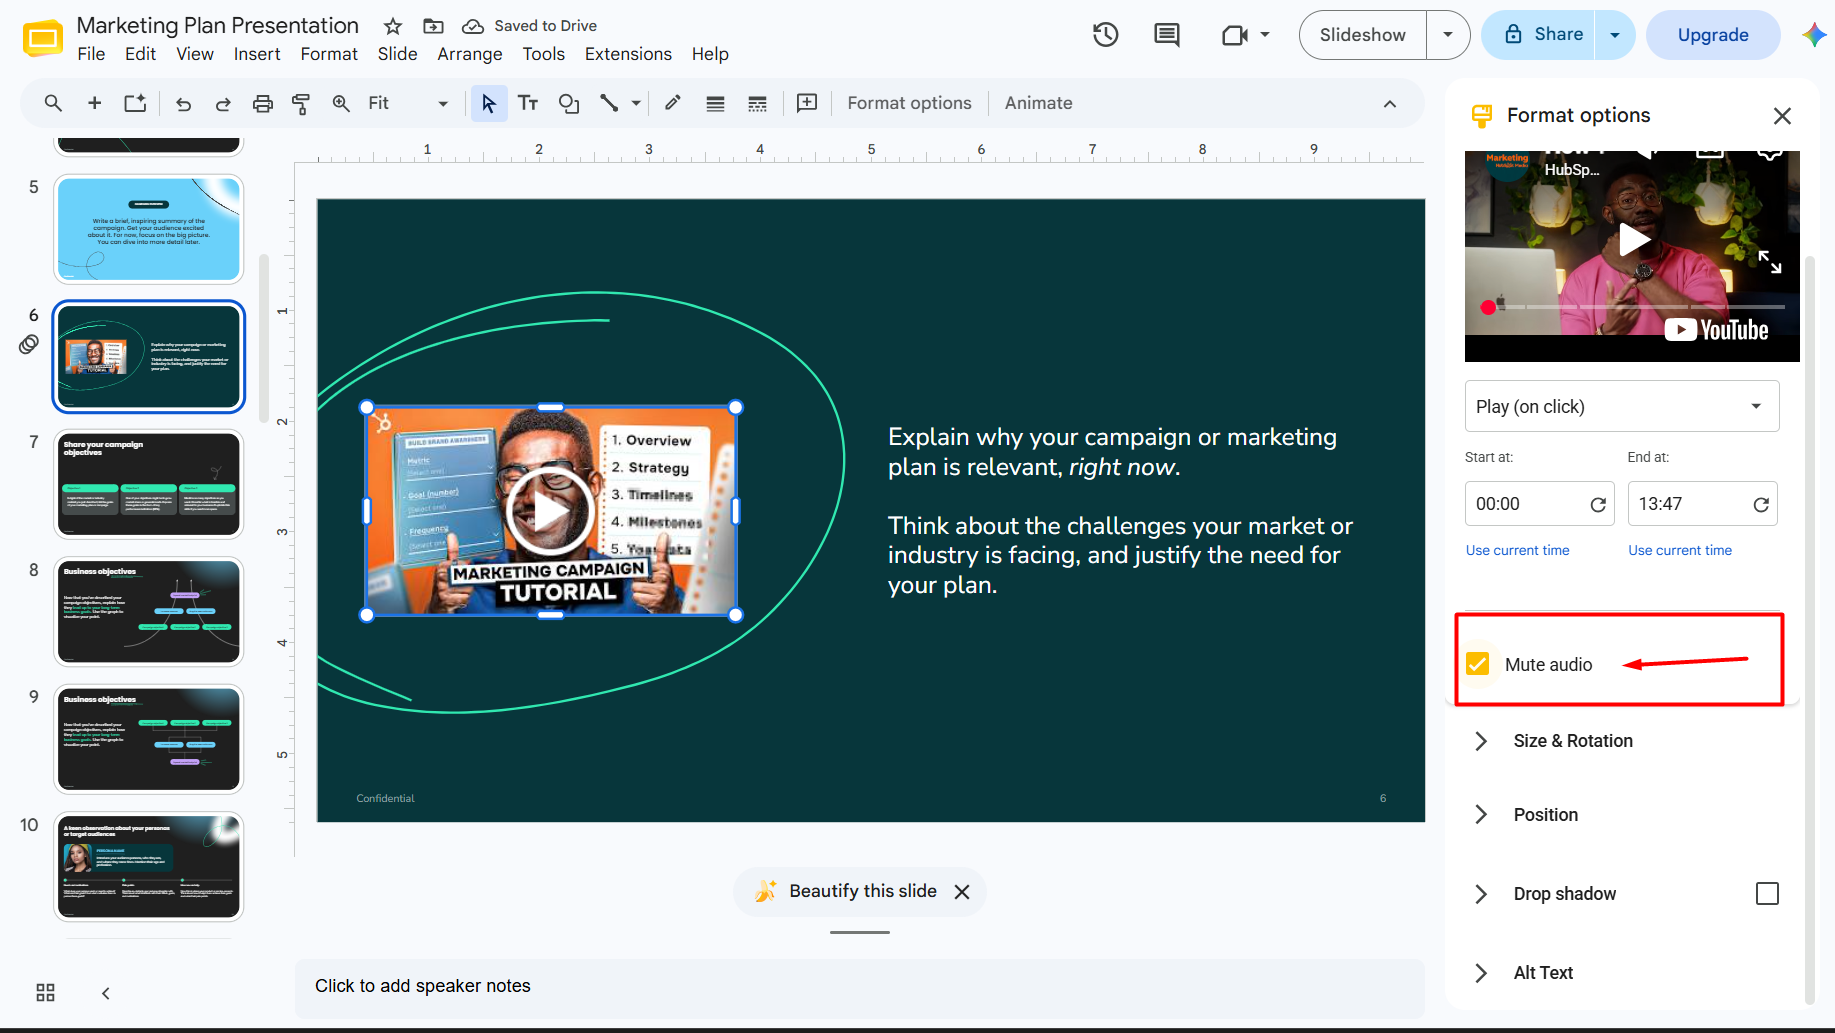
    Muting the video’s audio is useful when:

    • You’re narrating live.
    • Background music isn’t needed.
    • The video’s audio quality is poor.

    Set Start and End Times

    One of my favorite features is trimming playback without editing the original video file.
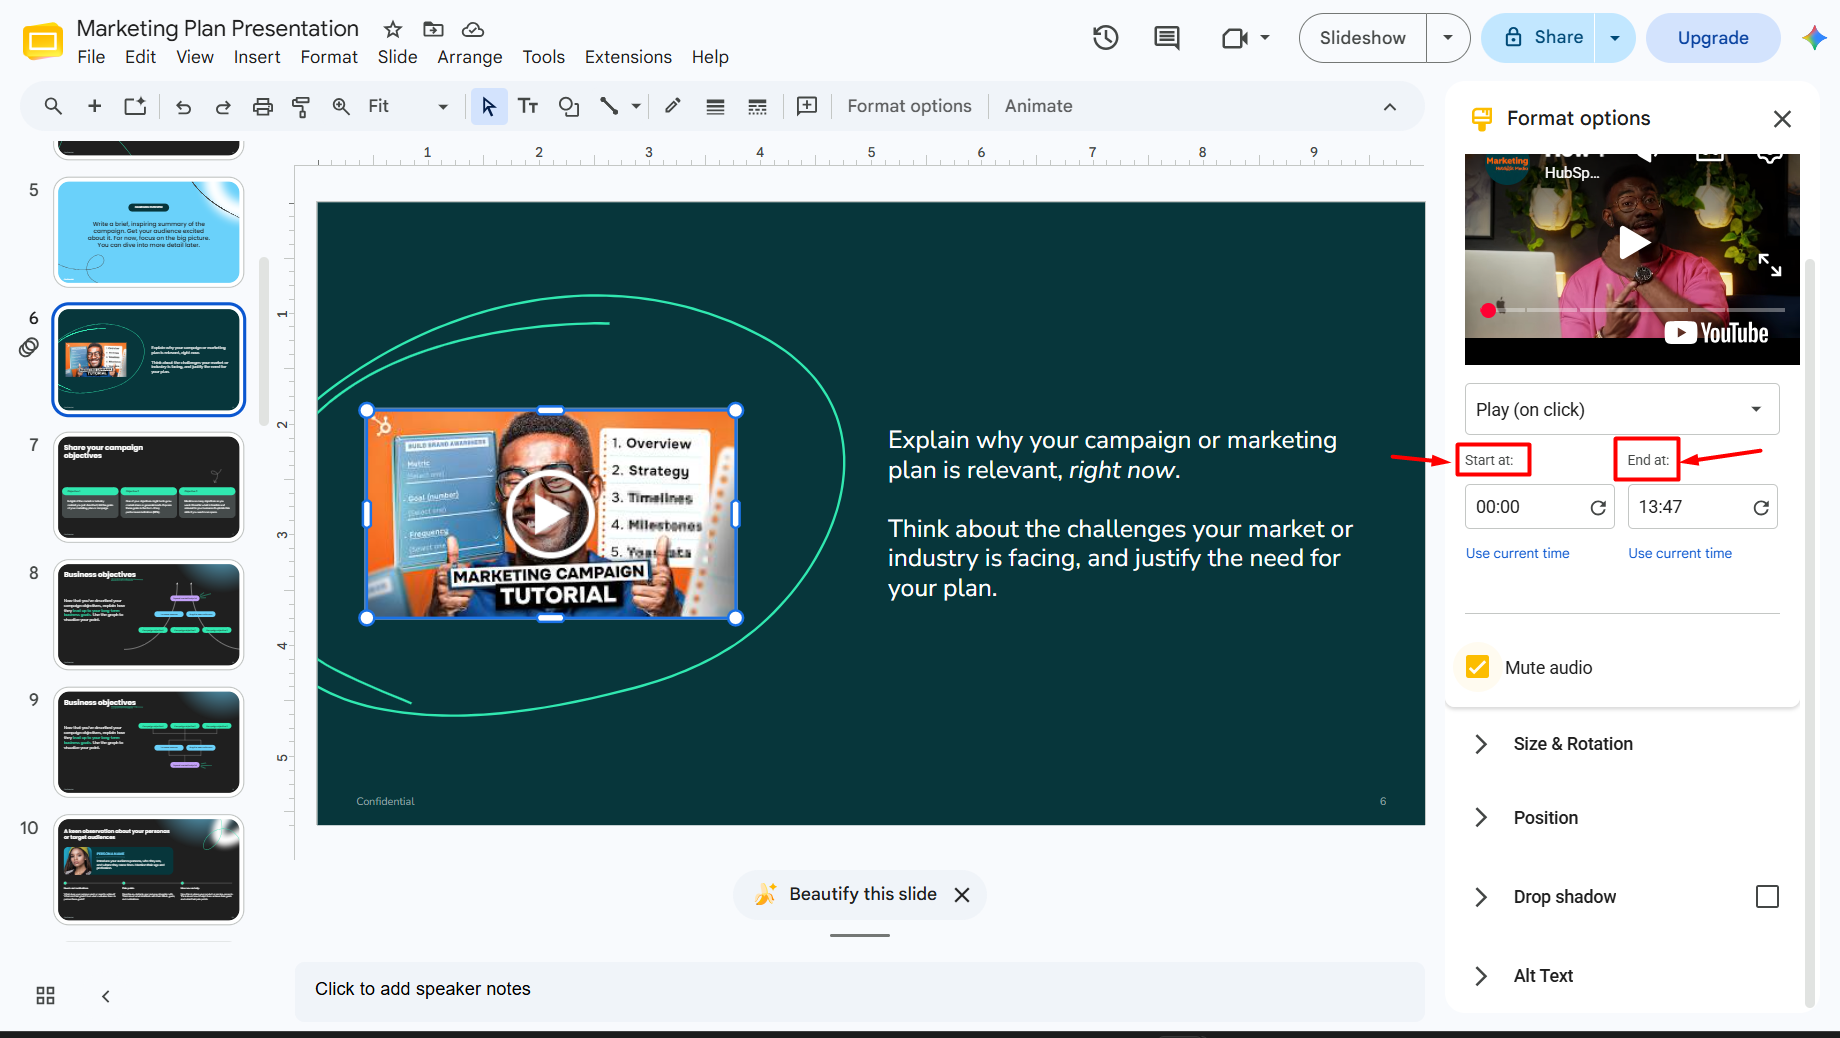
    Instead of playing the entire video, you can specify:

    • Start time
    • End time

    For example:

    • Start at 00:45
    • End at 01:30

    This allows you to show only the most relevant section of a longer video.

    Skip Long Introductions

    Many YouTube videos begin with branding, intros, or advertisements for the creator’s channel.

    Rather than making your audience wait, start playback from the section that delivers the information they need.

    It creates a smoother presentation and keeps people engaged.

    How to Trim a Video in Google Slides?

    Google Slides doesn’t permanently edit your video. Instead, it lets you control which portion plays during the presentation.

    To trim playback:

    1. Select the embedded video.
    2. Open the playback settings.
    3. Enter a Start Time.
    4. Enter an End Time.

    Only that section will play during your presentation.

    This is perfect for:

    • Tutorials
    • Product demos
    • Webinar highlights
    • Interviews
    • Recorded presentations

    Limitation

    If you need to:

    • Remove scenes
    • Cut unwanted footage
    • Add transitions
    • Add captions
    • Edit audio

    You’ll need to edit the video first using a dedicated video editor before uploading it to Google Drive or YouTube.

    Video Not Playing? Here’s How to Fix It

    One of the most common frustrations is clicking a video during a presentation only to find that it doesn’t play.

    Fortunately, most playback problems are easy to fix.

    Check Your Internet Connection

    YouTube videos and most Google Drive videos require an internet connection.

    If your connection is slow or unavailable:

    • Videos may buffer.
    • Playback may fail.
    • Embedded YouTube videos may not load.

    If you’re presenting in a venue with unreliable Wi-Fi, test the connection beforehand or consider alternative presentation methods if appropriate.

    Verify Google Drive Permissions

    If viewers receive a permission error, the video’s sharing settings are likely incorrect.

    Open Google Drive.

    Check the video’s sharing permissions.

    Ensure the people viewing your presentation can access the file.

    This is one of the most common issues I encounter when collaborating with teams.

    Make Sure the Video Still Exists

    If someone deletes the original YouTube video or removes the Google Drive file, Google Slides won’t be able to play it.

    Before an important presentation, verify that:

    • The YouTube video is still available.
    • The Google Drive file hasn’t been deleted or moved.
    • The video link hasn’t changed.

    Use a Supported Video Format

    If you’re uploading your own video, MP4 is generally the safest and most compatible format.

    Unsupported or corrupted files may fail to play correctly.

    Clear Browser Cache

    Occasionally, browser cache can interfere with video playback.

    If videos aren’t loading:

    • Refresh the page.
    • Clear your browser cache.
    • Restart your browser.
    • Try opening the presentation in another supported browser.

    Test Before Presenting

    This is the simplest yet most important tip.

    I always play every embedded video before presenting.

    Testing helps identify:

    • Permission issues
    • Broken links
    • Buffering problems
    • Incorrect playback settings

    Spending five minutes testing can prevent awkward interruptions during a live presentation.

    Best Practices for Adding Videos to Google Slides

    After creating dozens of presentations, I’ve found that a few simple habits make a big difference.

    Keep Videos Short

    Short videos maintain audience attention better than long clips.

    Aim for 30 seconds to 2 minutes whenever possible.

    Use Videos Purposefully

    Every video should support your message.

    Avoid adding videos simply because they look impressive.

    Ask yourself:

    “Does this video help explain my point better than text or images?”

    If the answer is no, it’s probably unnecessary.

    Match Your Presentation Style

    Choose videos that align with your presentation’s design, tone, and audience.

    For example:

    • Corporate presentations should use professional-looking videos.
    • Educational presentations can include tutorials and explainers.
    • Marketing presentations benefit from product demos and customer stories.

    Test on the Presentation Device

    A presentation that works perfectly on your laptop may behave differently on another computer or projector.

    Whenever possible, open your presentation on the device you’ll actually use.

    Avoid Overusing Videos

    Too many videos can overwhelm your audience and interrupt the flow of your presentation.

    Instead of embedding videos on every slide, use them strategically to emphasize important moments.

    Common Mistakes to Avoid

    Even experienced presenters make these mistakes.

    Avoid them to ensure a smoother presentation:

    • Embedding videos without testing playback.
    • Forgetting to update Google Drive sharing permissions.
    • Stretching videos and distorting their aspect ratio.
    • Using videos that are much longer than necessary.
    • Relying entirely on autoplay.
    • Using low-quality or blurry videos.
    • Deleting or moving the original video after embedding it.
    • Ignoring internet requirements before presenting.

    Create Your Presentation Faster Before Adding Videos

    Adding videos is one of the final steps in creating a compelling presentation. Before you start enhancing your slides with multimedia, it’s worth making sure the presentation itself has a strong structure and professional design.
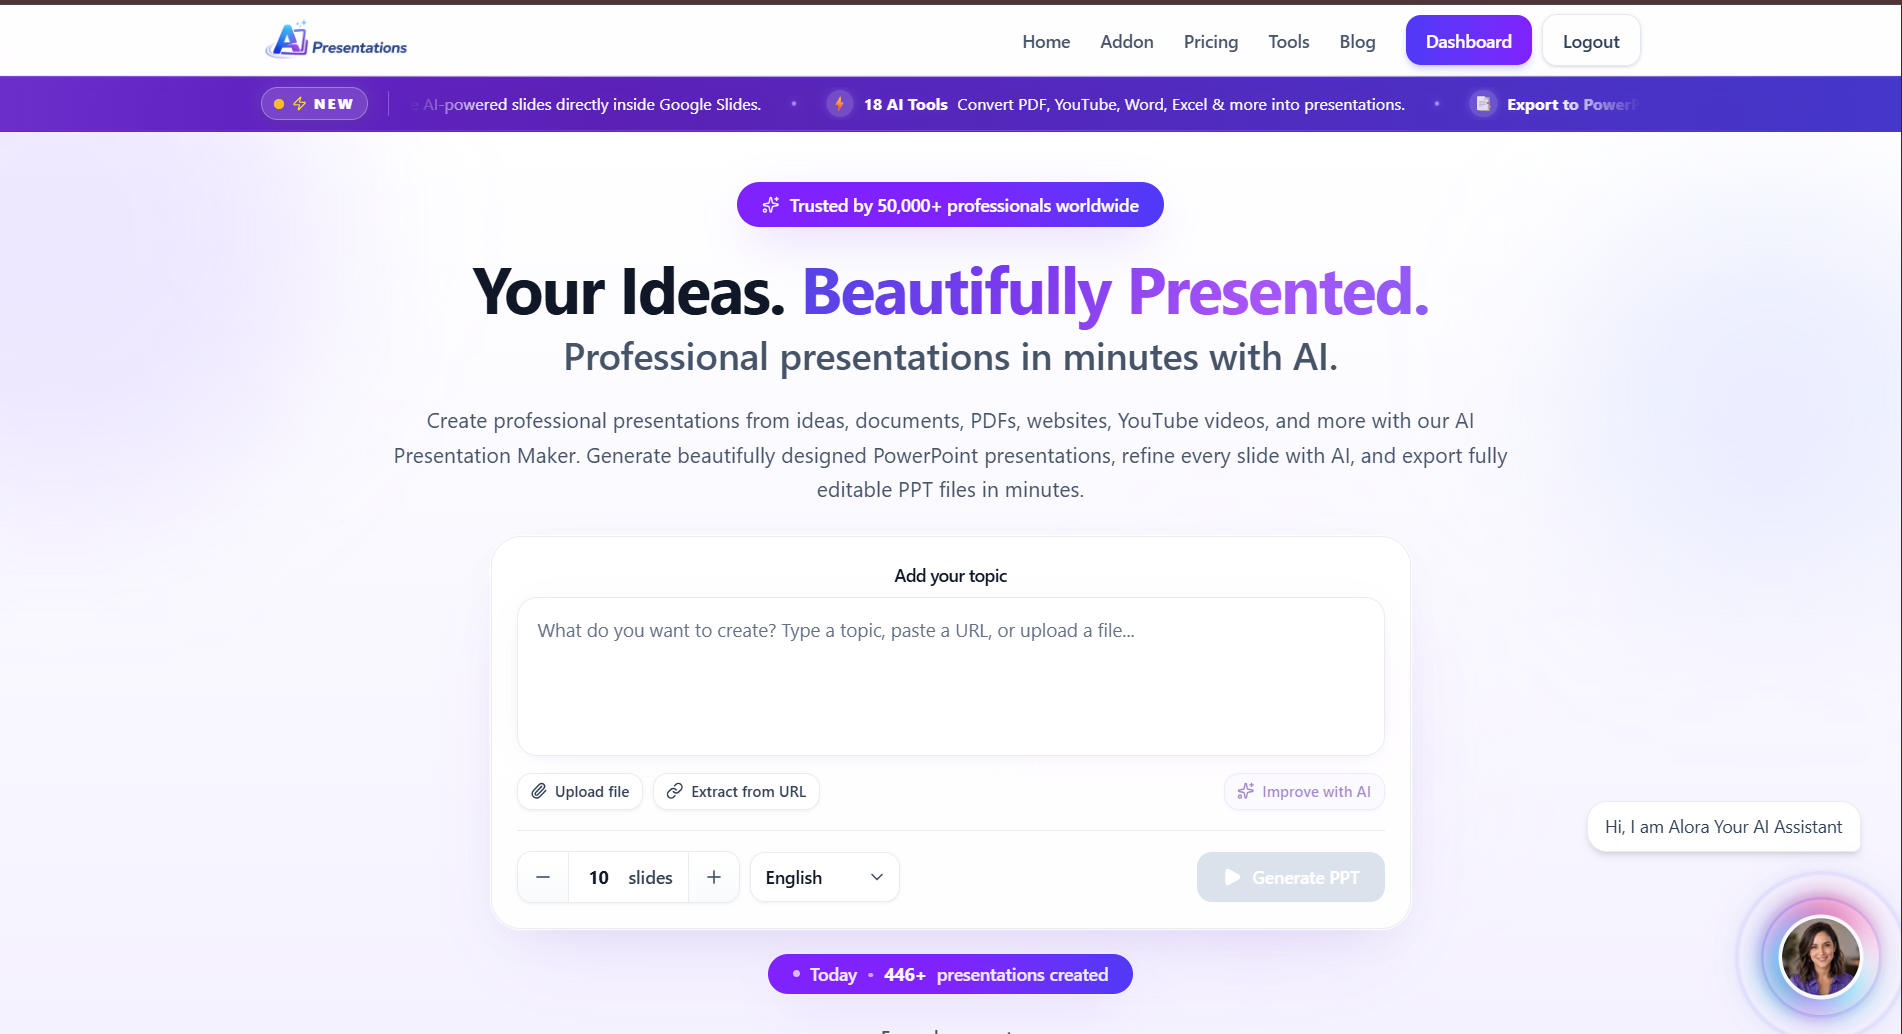
    If you’re starting from a blank slide, AI Presentations can help you generate a complete presentation in minutes. Instead of building every slide manually, you can create a polished draft, customize the content in Google Slides, and then use the techniques in this guide to embed videos where they add the most value.

    This workflow saves time while still giving you full control over your final presentation.

    Related: How to Add Audio to Google Slides (Step-by-Step Guide 2026)

    Frequently Asked Questions

    Q1. Can I add a video to Google Slides for free?

    Yes. Google Slides allows you to embed videos from YouTube and Google Drive at no additional cost.

    Q2. Can Google Slides play MP4 videos?

    Yes. Upload the MP4 file to Google Drive first, then insert it into your presentation through the Google Drive option.

    Q3. Can I upload a video directly from my computer?

    The typical workflow is to upload the video to Google Drive and then insert it into Google Slides from there.

    Q4. Can I make a video autoplay in Google Slides?

    Yes, depending on the available playback settings in your version of Google Slides, you can configure videos to play automatically during a presentation.

    Q5. Why isn’t my video playing?

    Common causes include:

    • No internet connection
    • Incorrect Google Drive permissions
    • Unsupported or corrupted video files
    • Removed YouTube videos
    • Browser-related issues

    Checking these areas usually resolves the problem.

    Q6. Can I use Vimeo videos?

    Google Slides doesn’t provide native Vimeo embedding like it does for YouTube. If you want to use Vimeo content, you’ll typically need to link to it or use a compatible workflow outside of direct embedding.

    Q7. Can videos play offline?

    YouTube videos generally require an internet connection. Google Drive videos may also depend on connectivity and access permissions, so test your presentation in the environment where you’ll present.

    Conclusion

    Adding a video to Google Slides is a simple way to make your presentations more engaging, memorable, and informative. Whether you’re embedding a YouTube tutorial, a product demonstration from Google Drive, or your own MP4 recording, Google Slides gives you the flexibility to integrate multimedia with just a few clicks.

    The key is to choose the right insertion method, adjust playback settings to fit your presentation, and test everything before you present. Paying attention to permissions, video quality, and slide layout will help ensure a smooth experience for both you and your audience.

    If you’re creating a presentation from scratch, consider using AI Presentations to generate a professional slide deck in minutes. Once your content is ready, you can enhance it with videos using the techniques covered in this guide to deliver a more engaging and impactful presentation.
  • How to Add Audio to Google Slides (Step-by-Step Guide 2026)

    Adding audio to a presentation can make your slides more engaging, interactive, and memorable. Whether you’re creating a classroom lesson, business presentation, sales pitch, training module, or portfolio, audio helps explain ideas more effectively than text alone.

    Google Slides includes a built-in audio feature that lets you insert music, voice recordings, podcasts, or sound effects directly into individual slides. Once added, you can configure the audio to play automatically, loop continuously, or start only when clicked.

    This guide walks you through everything you need to know about adding audio to Google Slides, including supported formats, playback settings, troubleshooting tips, and best practices.

    Can You Add Audio to Google Slides?

    Yes.

    Google Slides allows you to insert audio files directly into your presentation, provided the files are stored in Google Drive.

    Common use cases include:

    • Voice narration
    • Background music
    • Sound effects
    • Language pronunciation
    • Educational explanations
    • Meeting recordings
    • Product demonstrations
    • Podcast clips

    Unlike embedding audio from external websites, Google Slides stores the audio reference through Google Drive, ensuring reliable playback when shared with others who have the appropriate permissions.

    Supported Audio Formats

    Google Slides supports several common audio formats, including:

    • MP3 (recommended)
    • WAV
    • OGG

    For the best compatibility across browsers and devices, MP3 is generally the safest choice because it offers excellent quality with smaller file sizes.

    Before inserting audio, upload the file to Google Drive and ensure anyone viewing the presentation has permission to access it if required.

    How to Add Audio to Google Slides?

    Follow these simple steps.

    Step 1: Upload the Audio File

    Open Google Drive and upload your audio file.

    Supported examples include:

    • Voice recordings
    • MP3 music
    • Narration
    • Podcast excerpts
    • Sound effects

    Wait until the upload completes.

    Step 2: Open Your Presentation

    Open Google Slides.

    google slides

    Navigate to the presentation where you want to include the audio.

    Select the slide that should contain the audio.

    Step 3: Insert Audio

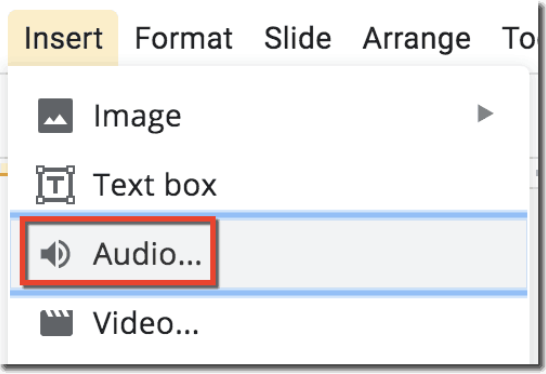
    Click:

    Insert → Audio

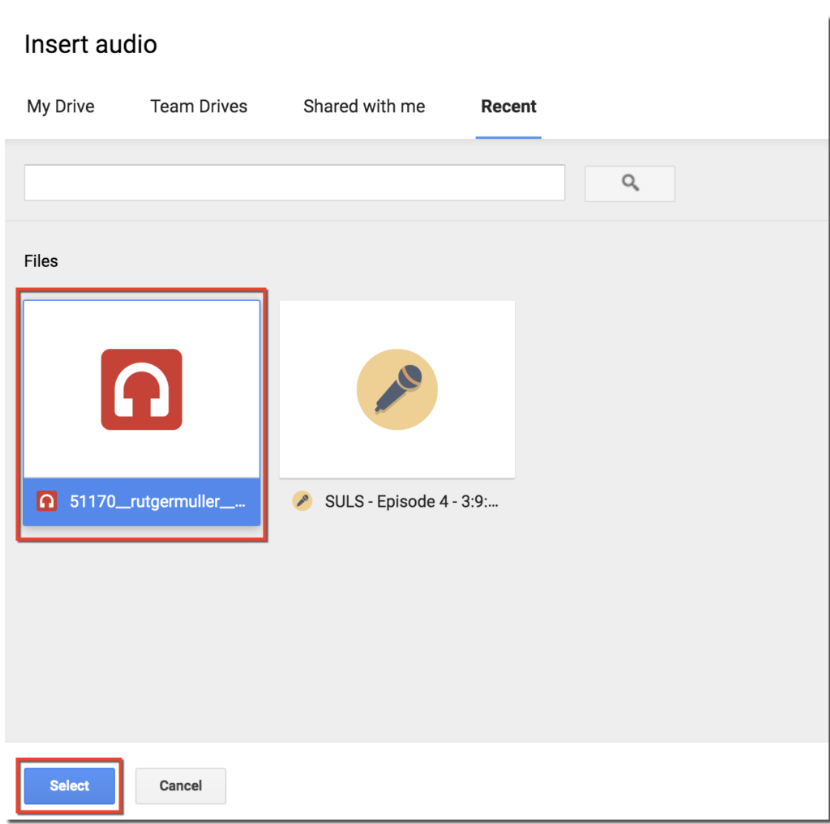
    A window will display audio files available in your Google Drive.

    Choose the desired file.

    Click Select.

    Google Slides places a speaker icon on the slide, representing the inserted audio.

    Step 4: Position the Audio Icon

    You can move the speaker icon anywhere on the slide.

    Many presenters place it:

    • In a corner
    • Behind an image
    • Outside the visible slide area (if appropriate)
    • Near instructions for learners

    The icon’s location does not affect playback.

    Step 5: Configure Playback Settings

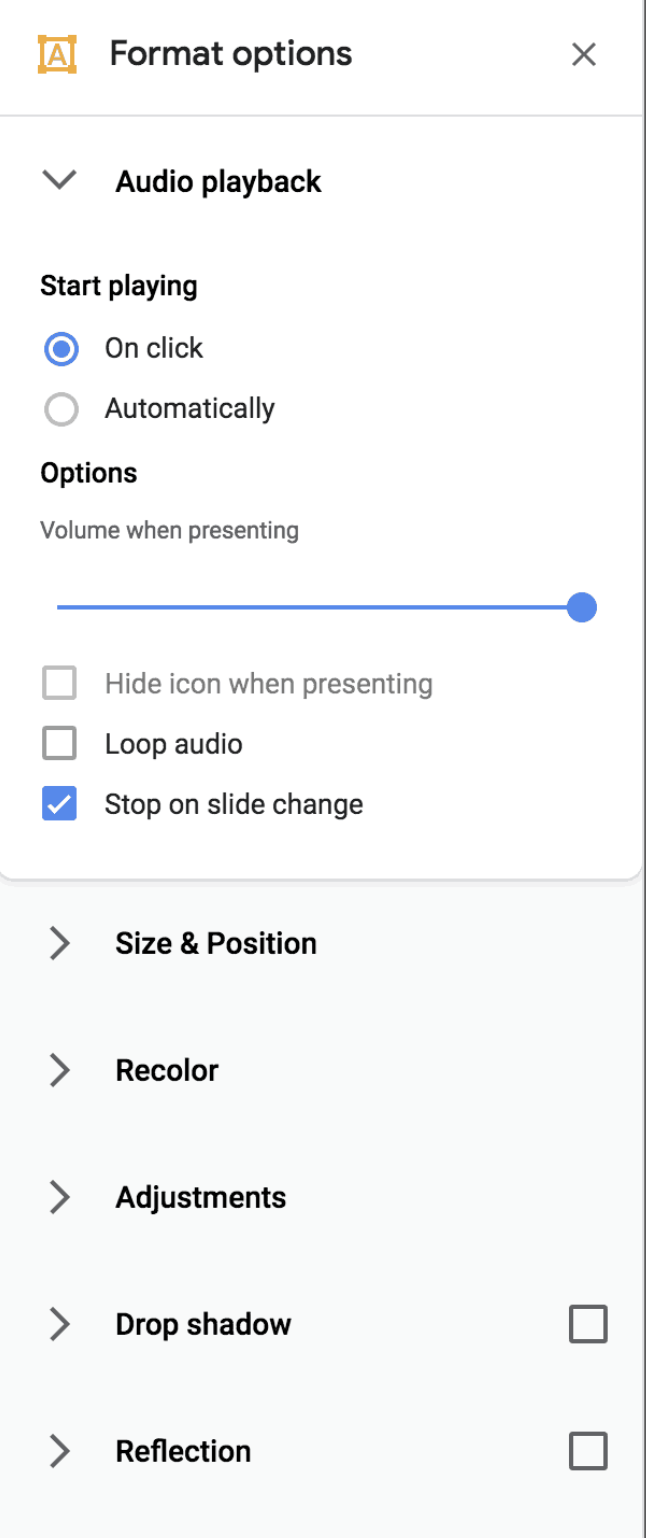
    Click the audio icon.

    Open Format Options.

    You’ll see playback controls such as:

    • Play on click
    • Play automatically
    • Hide icon during presentation
    • Loop audio
    • Stop on slide change
    • Volume adjustment

    These settings let you tailor the listening experience for your audience.

    How to Make Audio Play Automatically?

    Automatic playback is useful when creating:

    • Online lessons
    • Self-paced courses
    • Business demos
    • Digital kiosks
    • Product walkthroughs

    To enable autoplay:

    1. Select the audio icon.
    2. Open Format Options.
    3. Under Audio Playback, choose Automatically.

    Now the audio starts as soon as the slide appears during the presentation.

    How to Loop Audio in Google Slides?

    Looping repeats the audio until the presentation moves to another slide or the presentation ends.

    To loop audio:

    1. Select the speaker icon.
    2. Open Format Options.
    3. Enable Loop Audio.

    This works well for:

    • Background music
    • Ambient sounds
    • Exhibition displays
    • Waiting screens
    • Trade show presentations

    How to Hide the Audio Icon?

    If you don’t want your audience to see the speaker icon:

    1. Click the inserted audio.
    2. Open Format Options.
    3. Enable Hide icon when presenting.

    The audio will still play according to your selected playback settings, but the icon won’t appear during slideshow mode.

    Can You Add Voice Narration?

    Absolutely.

    Many educators, trainers, and professionals record their own voice and upload it as an MP3 file to Google Drive before inserting it into Google Slides.

    Voice narration is especially useful for:

    • Online learning
    • Employee onboarding
    • Product training
    • Client presentations
    • Sales demonstrations
    • Investor pitches

    You can record narration using any audio recording software, export it as an MP3, upload it to Google Drive, and insert it using the same steps described above.

    Tips for Better Audio Quality

    To create a professional presentation:

    • Record in a quiet environment.
    • Use a dedicated microphone when possible.
    • Remove background noise before uploading.
    • Keep narration concise.
    • Normalize audio volume so each recording sounds consistent.
    • Test playback on multiple devices.
    • Use high-quality MP3 files for better compatibility.

    Clear audio significantly improves the viewer’s experience and helps maintain engagement throughout your presentation.

    Create Professional Presentations Faster with AI

    Once you’ve added audio to your Google Slides presentation, you may also want to improve the overall design, structure, and visual appeal of your slides.

    Instead of manually designing every slide, consider using AI Presentations App to generate professional presentations in minutes. You can create complete slide decks from a topic, text, PDF, Word document, YouTube video, images, or other content sources. The generated presentations are fully editable, making it easy to refine your slides before adding narration or background audio in Google Slides.

    This workflow combines AI-powered content creation with Google Slides’ collaboration and audio features, helping students, educators, marketers, and business professionals create polished presentations much faster.

    Why Is Audio Not Playing in Google Slides?

    Sometimes your audio may not play as expected. The issue is usually related to file permissions, browser settings, or unsupported formats rather than Google Slides itself.

    Here are the most common problems and their solutions.

    1. Google Drive Permissions

    Google Slides references audio files stored in Google Drive. If viewers don’t have permission to access the file, the audio won’t play.

    Solution:

    • Open Google Drive.
    • Right-click the audio file.
    • Select Share.
    • Grant appropriate viewing permissions or adjust the sharing settings if the presentation is intended for a wider audience.

    2. Unsupported Audio Format

    Google Slides works best with:

    • MP3
    • WAV
    • OGG

    If your audio uses another format, convert it to MP3 before uploading.

    3. Browser Issues

    Older browsers or disabled media permissions may prevent playback.

    Try the following:

    • Refresh the presentation.
    • Update your browser.
    • Clear your browser cache.
    • Test the presentation in another browser.

    4. Audio File Was Deleted

    If the original file is removed from Google Drive, Google Slides can no longer access it.

    Solution:

    Restore the deleted file or upload it again and reinsert the audio.

    5. Internet Connection

    Google Slides relies on cloud-based files. A poor internet connection may delay or interrupt playback.

    If you’re presenting in an environment with unreliable internet, test everything beforehand or consider downloading the presentation if your workflow supports offline access.

    Best Practices for Adding Audio in Google Slides

    Adding audio can enhance your presentation, but it should support your message rather than distract from it.

    Follow these best practices:

    • Keep narration concise and focused.
    • Use background music sparingly.
    • Maintain a consistent audio volume throughout the presentation.
    • Avoid overlapping multiple audio tracks.
    • Test playback on desktop and mobile devices.
    • Use autoplay only when it improves the viewer’s experience.
    • Ensure audio aligns naturally with the slide content.
    • Optimize audio files to reduce loading time.
    • Always preview the entire presentation before sharing.

    Well-planned audio can improve engagement, especially in educational lessons, product demos, webinars, and self-guided presentations.

    Common Mistakes to Avoid

    Many users encounter avoidable issues when working with audio in Google Slides.

    Avoid these common mistakes:

    • Uploading unsupported audio formats.
    • Forgetting to upload files to Google Drive.
    • Restricting access to the audio file.
    • Using poor-quality recordings with background noise.
    • Playing loud background music over narration.
    • Leaving autoplay enabled where manual playback is more appropriate.
    • Not testing the presentation before a live audience.

    Taking a few extra minutes to review your presentation can help prevent technical issues during delivery.

    Final Thoughts

    Adding audio to Google Slides is an excellent way to create more engaging, informative, and memorable presentations. Whether you’re using voice narration, background music, or instructional sound effects, the built-in audio feature makes it easy to enhance your slides without requiring advanced technical skills.

    Following the steps in this guide, you can confidently insert audio, configure playback settings, troubleshoot common issues, and deliver presentations that capture your audience’s attention.

    If you’re looking to save even more time, consider creating your presentation with AI Presentation Tool mentioned above before importing it into Google Slides. AI-generated content, professionally designed layouts, and fully editable slides can dramatically reduce presentation creation time while helping you produce polished, presentation-ready results.

    Whether you’re a student, educator, business professional, or content creator, combining AI-powered presentation generation with Google Slides’ audio capabilities is an effective way to create presentations that are both visually impressive and highly engaging.

    Frequently Asked Questions

    Can I add audio directly from my computer?

    Not directly. First upload the audio file to Google Drive, then insert it into Google Slides using Insert → Audio.

    What audio formats does Google Slides support?

    Google Slides supports MP3, WAV, and OGG audio files. MP3 is generally recommended for the best compatibility.

    Can I make audio play automatically?

    Yes. Select the audio icon, open Format Options, and choose Play Automatically.

    Can I loop background music?

    Yes. Enable the Loop Audio option in the playback settings.

    Can I hide the speaker icon?

    Yes. Use Hide icon when presenting under the audio playback settings.

    Can I record audio inside Google Slides?

    No. Google Slides does not include a built-in audio recorder. Record your narration with another application, save it as an MP3, upload it to Google Drive, and then insert it into your presentation.

    Why can’t others hear my audio?

    Most playback issues occur because viewers don’t have permission to access the audio file in Google Drive or because the file has been moved or deleted.

    Can I use background music across multiple slides?

    Google Slides doesn’t support continuous background music across all slides. Audio is attached to individual slides, although looping can keep it playing while that slide remains active.

    Does Google Slides support voice narration?

    Yes. You can record your narration separately, upload it to Google Drive, and insert it into any slide.

    Is adding audio to Google Slides free?

    Yes. Anyone with a Google account can use the built-in audio feature at no additional cost.

    Must read: How to Transfer PowerPoint to Google Slides (Without Losing Formatting)

  • How to Transfer PowerPoint to Google Slides (Without Losing Formatting)

    How to Transfer PowerPoint to Google Slides (Without Losing Formatting)

    If you’ve ever received a PowerPoint presentation but needed to collaborate using Google Workspace, you’ve probably wondered how to transfer PowerPoint to Google Slides without breaking the formatting.

    I’ve worked with both Microsoft PowerPoint and Google Slides for years, and one of the most common tasks I perform is converting presentations between the two platforms. While the process is simple, I’ve learned that there are a few important details that can save you from formatting headaches later.

    In this guide, I’ll show you exactly how to convert PowerPoint to Google Slides, explain what happens during the conversion process, share common issues I’ve encountered, and provide practical tips to preserve your presentation’s design.

    By the end, you’ll know how to upload PowerPoint to Google Slides, edit PPTX files online, and avoid the most common conversion mistakes.

    Quick Answer: How to Convert PowerPoint to Google Slides

    If you’re looking for the fastest method:

    1. Open Google Drive.
    2. Upload your PowerPoint (.PPT or .PPTX) file.
    3. Right-click the file.
    4. Select Open With → Google Slides.
    5. Click File → Save as Google Slides.

    Google Slides will automatically convert the PowerPoint presentation into an editable Google Slides file.

    Can Google Slides Open PowerPoint Files?

    Yes.

    Google Slides supports both:

    • PPT files
    • PPTX files

    This means you can upload PowerPoint presentations directly into Google Drive and open them in Google Slides without installing additional software.

    In my experience, standard presentations containing text, images, charts, and tables usually transfer very well. However, presentations with advanced animations, custom fonts, or complex SmartArt graphics may require minor adjustments after conversion.

    Why Transfer PowerPoint to Google Slides?

    Many users move from PowerPoint to Google Slides because of the collaboration benefits.

    Some advantages include:

    • Real-Time Collaboration: Multiple team members can edit slides simultaneously.
    • Cloud Accessibility: Access presentations from any device with an internet connection.
    • Automatic Saving: Google Slides automatically saves changes.
    • Easy Sharing: Instead of emailing large presentation files, you can simply share a link.

    For teams already using Google Workspace, converting PowerPoint files to Google Slides often creates a more efficient workflow.

    Step-by-Step Guide: Upload PowerPoint to Google Slides

    Open Google Drive. Click the New button.

    Select File Upload.

    Choose your PowerPoint presentation. Wait for the upload to complete.

    Locate the uploaded file. Right-click it.

    Select:

    Open With → Google Slides

    Google Slides will begin converting the presentation automatically.

    Once the file opens:

    1. Click File
    2. Select Save as Google Slides

    This creates a native Google Slides version while preserving the original PowerPoint file.

    I always recommend saving a separate Google Slides copy rather than overwriting the original presentation. This gives you a backup if anything doesn’t convert perfectly.

    What Happens During PowerPoint Conversion?

    Many people assume Google Slides simply copies the presentation.

    That’s not exactly what happens.

    Google Slides translates PowerPoint-specific elements into its own format.

    Most content transfers successfully, but compatibility varies by feature.

    Presentation Element Conversion Success
    Text Excellent
    Images Excellent
    Tables Excellent
    Charts Good
    Videos Usually Good
    Speaker Notes Usually Preserved
    Hyperlinks Excellent
    SmartArt Sometimes Modified
    Custom Fonts May Change
    Advanced Animations Often Lost

    This compatibility gap is one reason I always review every slide after converting a PPTX file to Google Slides.

    Common PowerPoint to Google Slides Formatting Issues

    After converting hundreds of presentations, I’ve noticed several recurring problems.

    1. Missing Fonts

    This is by far the issue I encounter most often.

    If PowerPoint uses a font unavailable in Google Slides, Google automatically replaces it.

    Solution

    Use widely supported fonts such as:

    • Arial
    • Calibri
    • Roboto
    • Open Sans

    before converting.

    2. Broken Layouts

    Complex slide layouts sometimes shift during conversion.

    Text boxes may move slightly, and image placement can change.

    Solution

    Review:

    • Title alignment
    • Image positioning
    • Spacing
    • Slide dimensions

    after importing.

    3. Animation Problems

    PowerPoint supports more advanced animations than Google Slides.

    In my testing, advanced motion effects often disappear entirely during conversion.

    Solution

    Rebuild important animations using Google Slides’ built-in animation tools.

    4. SmartArt Conversion Issues

    SmartArt frequently converts poorly.

    I’ve found that converting SmartArt to grouped shapes before importing significantly improves results.

    My Personal Checklist After Every Conversion

    Whenever I transfer a PowerPoint presentation to Google Slides, I spend five minutes checking:

    ✓ Fonts

    ✓ Charts

    ✓ Images

    ✓ Speaker notes

    ✓ Animations

    ✓ Embedded videos

    ✓ Hyperlinks

    ✓ Slide layouts

    This quick review helps catch issues before presenting to clients, colleagues, or stakeholders.

    PowerPoint vs Google Slides: Which Is Better?

    The answer depends on your needs.

    Feature PowerPoint Google Slides
    Offline Editing Excellent Limited
    Collaboration Good Excellent
    Cloud Sharing Good Excellent
    Design Flexibility Excellent Good
    Advanced Animations Excellent Limited
    Team Workflows Good Excellent
    Accessibility Good Excellent

    I generally recommend Google Slides for collaboration-heavy projects and PowerPoint for highly designed presentations requiring advanced visual effects.

    A Faster Way to Create Presentations with AI

    One thing I’ve noticed over the years is that presentation conversion isn’t usually the biggest challenge.

    Creating the presentation itself often takes far longer.

    That’s why many professionals are now using AI-powered presentation generators.

    For example, AI Presentations App allows users to generate presentations from several formats. It allows you to convert:

    Instead of spending hours building slides manually and then converting them between platforms, you can generate a complete presentation, edit it using AI, and export it as a PowerPoint file that works with both Microsoft PowerPoint and Google Slides.

    For teams that regularly create presentations, this can dramatically reduce preparation time.

    Best Practices for Importing PowerPoint Into Google Slides

    To achieve the best results:

    • Use Standard Fonts: Avoid obscure or proprietary fonts whenever possible.
    • Keep Layouts Simple: Complex designs are more likely to break during conversion.
    • Compress Large Images: Large media files can slow uploads and affect performance.
    • Test Before Presenting: Always review your converted presentation before sharing it.
    • Keep the Original File: Never delete the original PowerPoint presentation until you’ve confirmed the Google Slides version is accurate.

    Final Thoughts

    Transferring PowerPoint to Google Slides is usually a straightforward process. Simply upload the PPT or PPTX file to Google Drive, open it with Google Slides, and save it as a native Google Slides presentation.

    In my experience, most presentations convert successfully with minimal issues. The biggest challenges typically involve custom fonts, SmartArt graphics, and advanced animations. By reviewing your slides after conversion and following the best practices outlined above, you can avoid most compatibility problems.

    If you frequently create presentations from scratch, consider using AI-powered tools like AI Presentations to streamline the entire workflow. Rather than manually building slides and then converting them between formats, you can generate, edit, and export presentation-ready files that work seamlessly across both PowerPoint and Google Slides.

    Frequently Asked Questions

    Q1. Can Google Slides Open PowerPoint Files?

    Yes. Google Slides supports both PPT and PPTX files.

    Q2. How Do I Convert PPTX to Google Slides Online?

    Upload the PPTX file to Google Drive, open it with Google Slides, and save it as a Google Slides presentation.

    Q3. Can I Edit PowerPoint in Google Slides?

    Yes. Once imported, you can fully edit the presentation.

    Q4. Why Does My PowerPoint Look Different in Google Slides?

    Differences usually occur because of unsupported fonts, SmartArt elements, or advanced animations.

    Q5. Is Google Slides Free?

    Yes. Google Slides is available free with a Google account.

    Q6. Can I Convert Google Slides Back to PowerPoint?

    Yes. Go to:

    File → Download → Microsoft PowerPoint (.pptx)

    to export the presentation.

    Q7. Does Google Slides Support PowerPoint Animations?

    Basic animations may transfer successfully, but advanced PowerPoint animations often require manual recreation.